之前的修改在这里 → [hugo stack 主题美化]
特别鸣谢:ChatGPT、DeepSeek 🤩
20240630
搜索跳转 github.io
修改 /themes/hugo-theme-stack/layouts/page/search.json 第八行
{{- $data := dict "title" .Title "date" .Date "permalink" .Permalink "content" (.Plain) -}}
为
{{- $data := dict "title" .Title "date" .Date "permalink" (relURL .Permalink) "content" (.Plain) -}}
20240505
多图排版
参考文章 → Hugo 多图排版这样来::木木木木木 (immmmm.com)
增添到 /themes/hugo-theme-stack/assets/scss/partials/layout/article.scss
.article-content p:has(> img:nth-child(2)){column-count:2;column-gap:8px;margin:6px 0;}
.article-content p:has(> img:nth-child(3)){column-count:3;}
.article-content p:has(> img:nth-child(4)){column-count:4;}
.article-content p:has(> img:nth-child(5)){column-count:5;}
.article-content p:has(> img:nth-child(6)){column-count:4;}
.article-content p:has(> img:nth-child(2)) img{display:flex;}
.article-content p:has(> img:nth-child(6)) img{margin-bottom:8px;}
文章里输入 md 图片语法换行但不空行即可。
热力图
参考文章 → 如何给 Hugo 博客添加热力图 | 椒盐豆豉 (douchi.space)
新建 /themes/hugo-theme-stack/layouts/shortcodes/heatmap.html
<div id="heatmap" style="
  max-width: 1900px;
  height: 180px;
  padding: 2px;
  text-align: center;
  "
></div>
<script src="https://cdn.jsdelivr.net/npm/[email protected]/dist/echarts.min.js"></script>
<script type="text/javascript">
  var chartDom = document.getElementById('heatmap');
  var myChart = echarts.init(chartDom);
  window.onresize = function() {
      myChart.resize();
  };
  var option;

  // echart heatmap data seems to only support two elements tuple
  // it doesn't render when each item has 3 value
  // it also only pass first 2 elements when reading event param
  // so here we build a map to store additional metadata like link and title
  // map format {date: [{wordcount, link, title}]}
  // for more information see https://blog.douchi.space/hugo-blog-heatmap
  var dataMap = new Map();
  {{ range ((where .Site.RegularPages "Type" "post")) }}
    var key = {{ .Date.Format "2006-01-02" }};
    var value = dataMap.get(key);
    var wordCount = {{ .WordCount }};
    var link = {{ .RelPermalink}};
    var title = {{ .Title }};

    // multiple posts in same day
    if (value == null) {
      dataMap.set(key, [{wordCount, link, title}]);
    } else {
      value.push({wordCount, link, title});
    }
  {{- end -}}

  var data = [];
  // sum up the word count
  for (const [key, value] of dataMap.entries()) {
    var sum = 0;
    for (const v of value) {
      sum += v.wordCount;
    }
    data.push([key, (sum / 1000).toFixed(1)]);
  }

  var startDate = new Date();
  var year_Mill = startDate.setFullYear((startDate.getFullYear() - 1));
  var startDate = +new Date(year_Mill);
  var endDate = +new Date();

  var dayTime = 3600 * 24 * 1000;
  startDate = echarts.format.formatTime('yyyy-MM-dd', startDate);
  endDate = echarts.format.formatTime('yyyy-MM-dd', endDate);

  // change date range according to months we want to render
  function heatmap_width(months){
    var startDate = new Date();
    var mill = startDate.setMonth((startDate.getMonth() - months));
    var endDate = +new Date();
    startDate = +new Date(mill);

    endDate = echarts.format.formatTime('yyyy-MM-dd', endDate);
    startDate = echarts.format.formatTime('yyyy-MM-dd', startDate);

    var showmonth = [];
    showmonth.push([
        startDate,
        endDate
    ]);
    return showmonth
  };

  function getRangeArr() {
    const windowWidth = window.innerWidth;
    if (windowWidth >= 600) {
      return heatmap_width(12);
    } else if (windowWidth >= 400) {
      return heatmap_width(9);
    } else {
      return heatmap_width(6);
    }
  }

  option = {
    title: {
        top: 0,
        left: 'center',
        text: '博客热力图'
    },
    tooltip: {
      hideDelay: 1000,
      enterable: true,
      formatter: function (p) {
        const date = p.data[0];
        const posts = dataMap.get(date);
        var content = `${date}`;
        for (const [i, post] of posts.entries()) {
            content += "<br>";
            var link = post.link;
            var title = post.title;
            var wordCount = (post.wordCount / 1000).toFixed(1);
            content += `<a href="${link}" target="_blank">${title} | ${wordCount} k</a>`
        }
        return content;
      }
    },
    visualMap: {
        min: 0,
        max: 10,
        type: 'piecewise',
        orient: 'horizontal',
        left: 'center',
        top: 30,

        inRange: {
          //  [floor color, ceiling color]
          color: ['#7aa8744c', '#7AA874' ]
        },
        splitNumber: 4,
        text: ['千字', ''],
        showLabel: true,
        itemGap: 20,
    },
    calendar: {
        top: 80,
        left: 20,
        right: 4,
        cellSize: ['auto', 13],
        range: getRangeArr(),
        itemStyle: {
            color: '#F1F1F1',
            borderWidth: 1.5,
            borderColor: '#fff',
        },
        yearLabel: { show: false },
        // the splitline between months. set to transparent for now.
        splitLine: {
          lineStyle: {
            color: 'rgba(0, 0, 0, 0.0)',
            // shadowColor: 'rgba(0, 0, 0, 0.5)',
            // shadowBlur: 5,
            // width: 0.5,
            // type: 'dashed',
          }
        }
    },
    series: {
        type: 'heatmap',
        coordinateSystem: 'calendar',
        data: data,
    }
  };
  myChart.setOption(option);
  myChart.on('click', function(params) {
    if (params.componentType === 'series') {
      // open the first post on the day
      const post = dataMap.get(params.data[0])[0];
      const link = window.location.origin + post.link;
      window.open(link, '_blank').focus();
    }
});
</script>
文章里输入(去掉 \ ):
{\{< heatmap >}\}
效果如下:
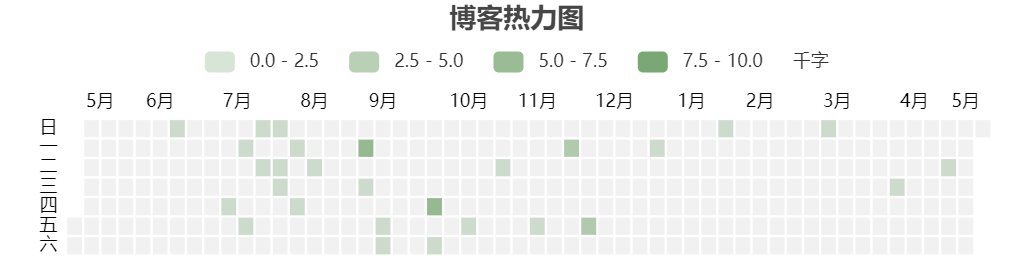
20230916
umami 统计
20240215 删除
参考文章 → 零成本、不需自建搭建Umami:开源易用的网站访问量统计工具 (thirdshire.com)
参考文章 → ■■Loading:《hugo 装修日志 02》■■ - 天堂错误文件 (naturaleki.one)
参考文章 → 个人网站 / 博客必备,零成本、低门槛创建专属数据分析工具:umami.is - 少数派 (sspai.com)
使用 GitHub 登录到 Vercel
,使用 GitHub 登录到 Supabase
。
Supabase 点击【New project】,可以命名为 umami,设置数据库密码(记住,后面要用), 区域选择 Northeast Asia(Tokyo)。
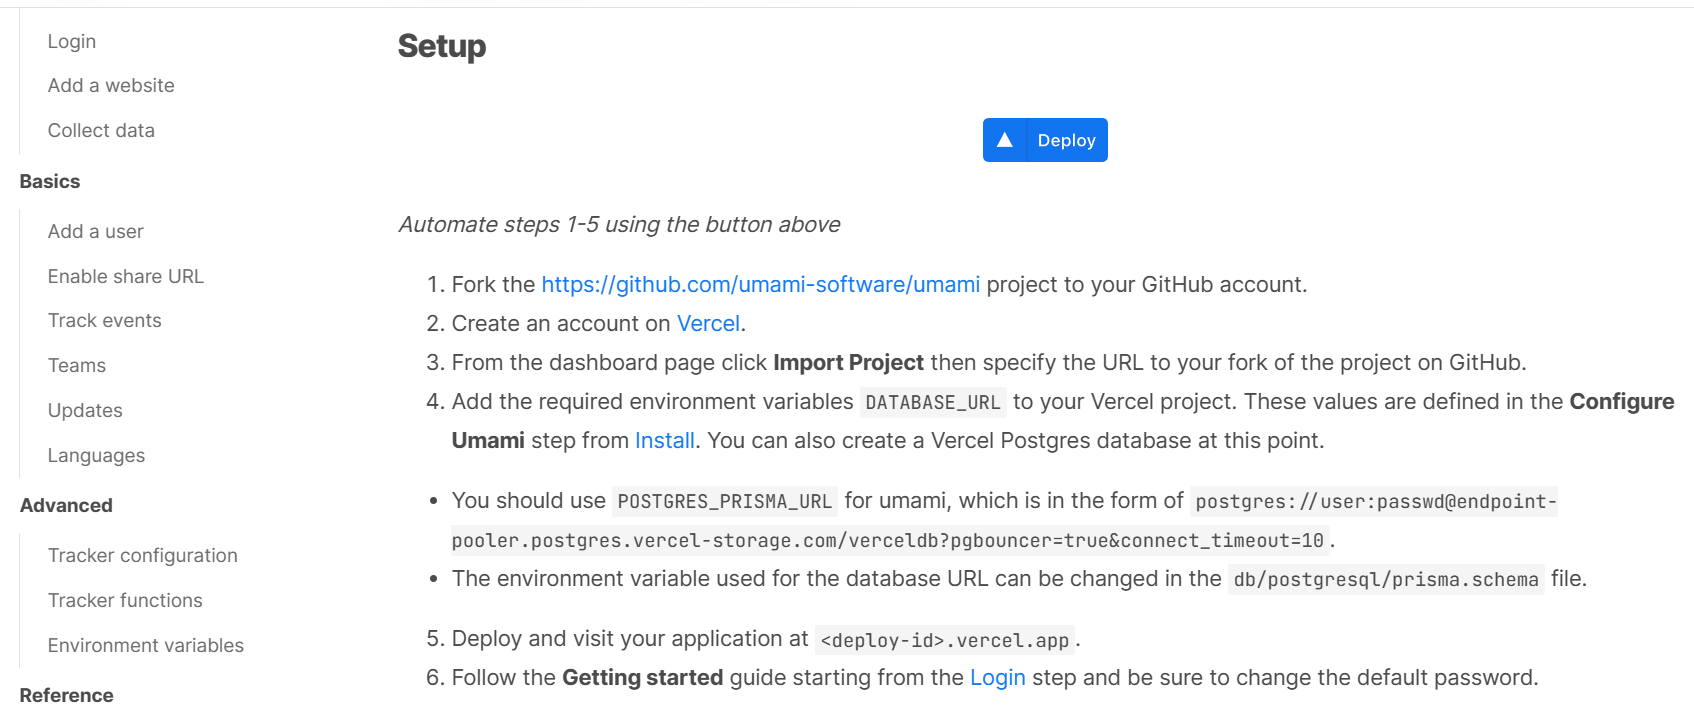
点击 umami
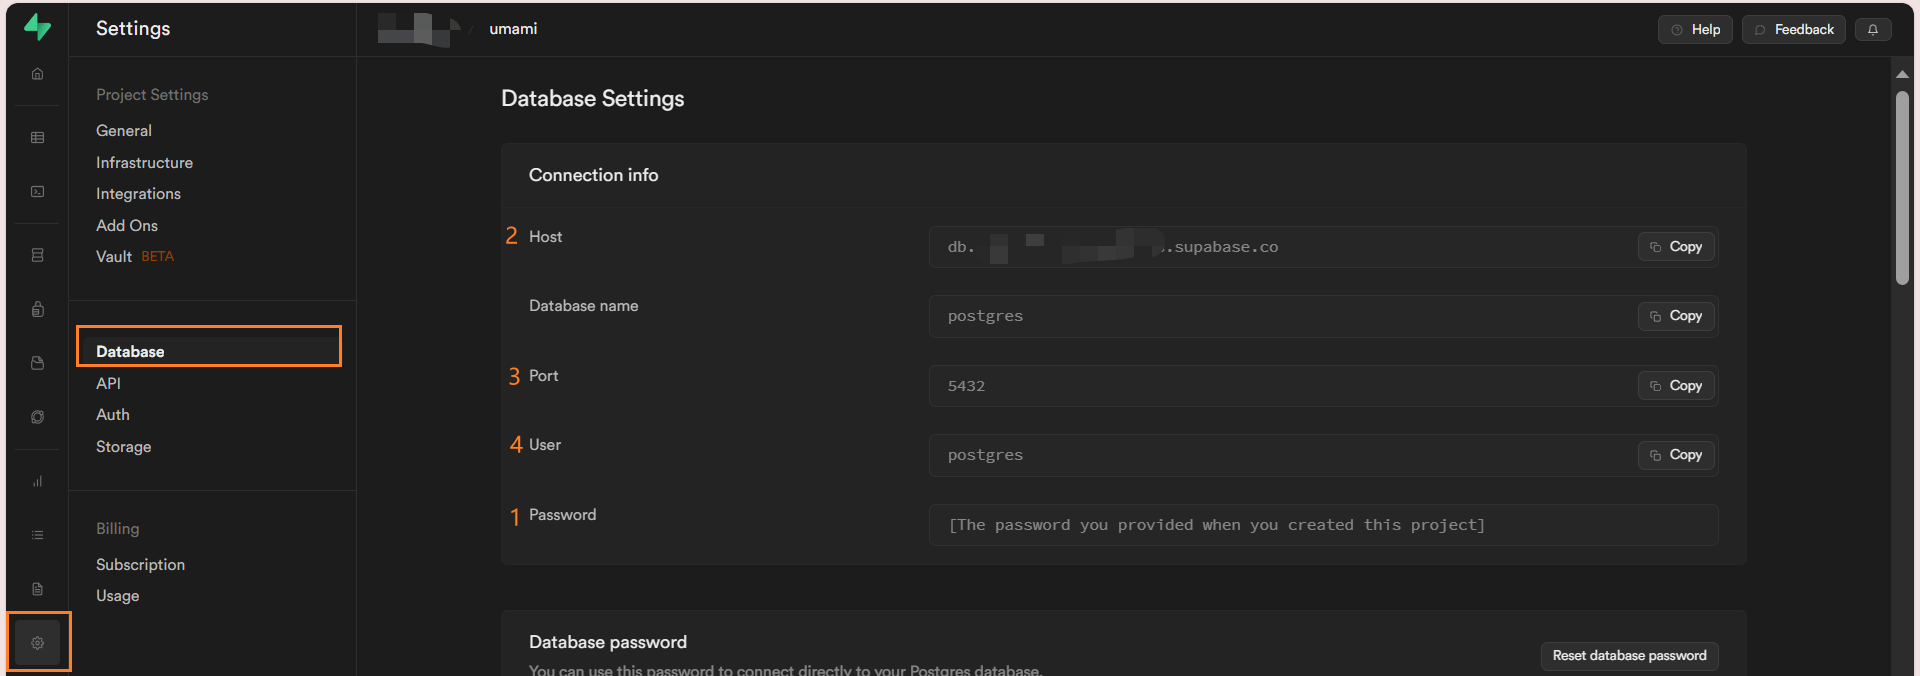
,点击蓝色【Depoly】按钮,填写 DATABASE_URL:postgresql://postgres:下图1Password@下图2Host:下图3Port/下图4User
(示例:postgresql://postgres:[email protected]:5432/postgres)
等待部署完毕,进入项目:
点击【Setting】——【Domains】—— 输入子域名 ——【Add】,绑定子域名;
点击【Setting】——【Environment Variables】—— 新增 IGNORE_IP:公网IP地址,过滤内部访问量。
点击子域名/Domians 下方网址,输入默认用户名 admin、默认密码 umami 登录,修改密码。
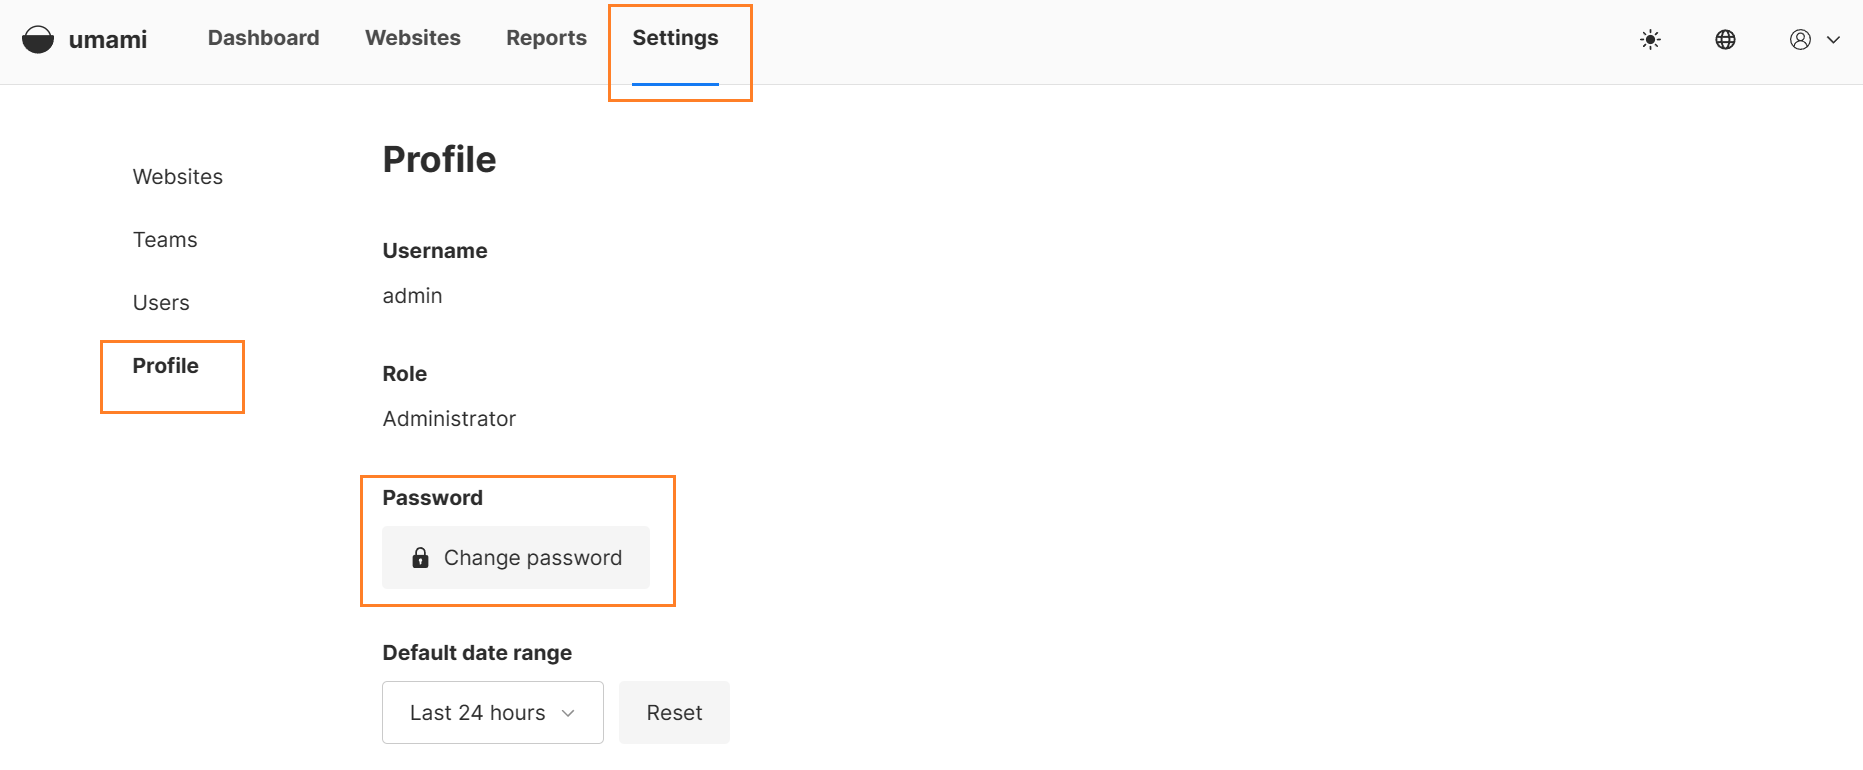
点击【Add website】,输入网站名称和域名(不含 https:// )。

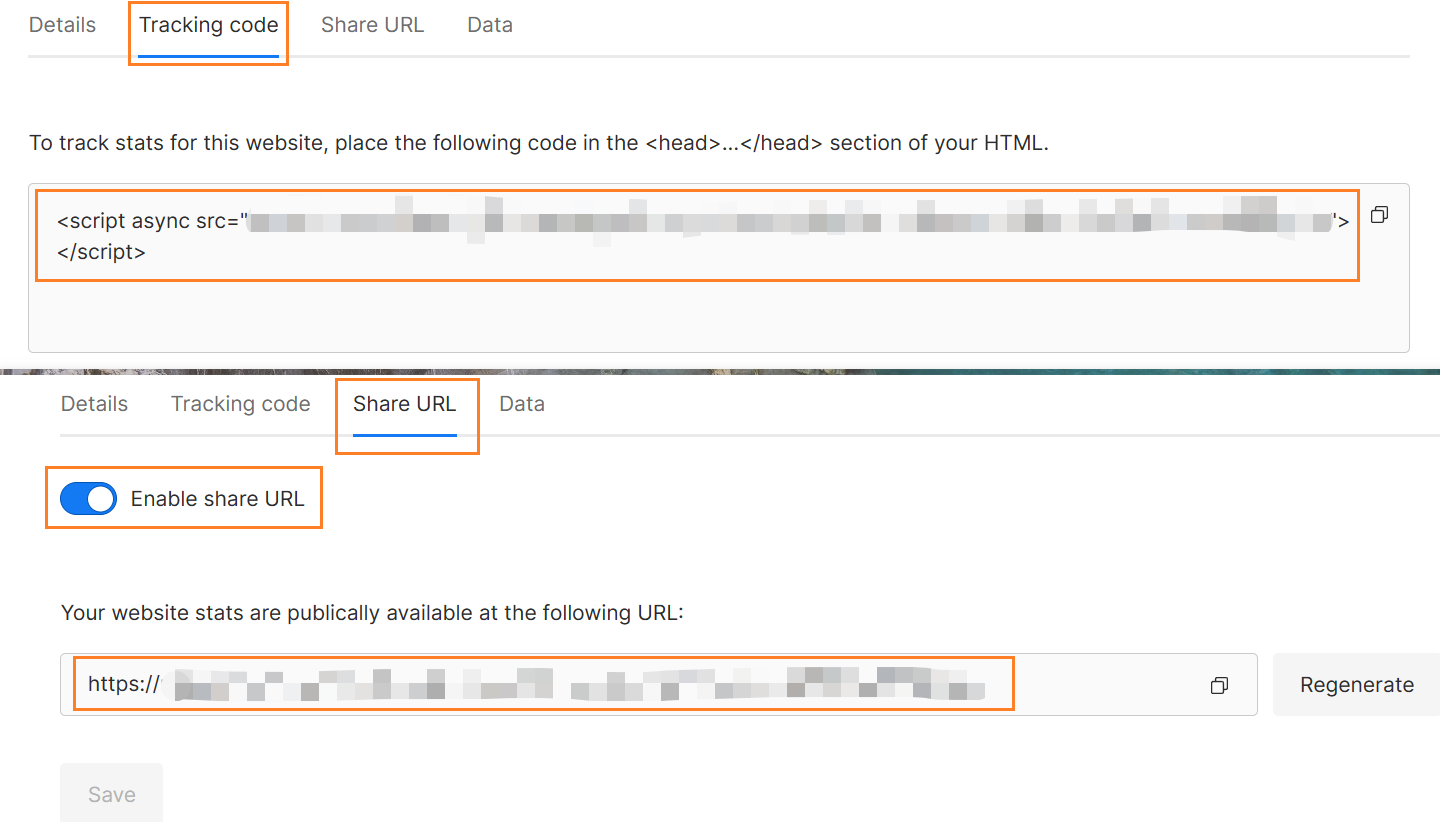
点击【Edit】——【Tracking code】—— 将下方代码粘贴 /themes/hugo-theme-stack/layouts/partials/head/custom.html。
(可选:共享链接 Share URL,别人通过下方链接也能看到你的访问数据。)
<head>
<script async src="https://xxxxxxxxx"></script>
</head>
鼠标指针
参考文章 → Hugo | 月球基地开发历程 (sleepymoon.cyou)
参考文章 → 前端项目更换鼠标样式-yihao1688的博客
参考文章 → 阴雨连绵的假期 | 第 41 周 (irithys.com)
本地路径不生效,干脆都用外链。
- Custom Cursor 选个喜欢的样式,截图(正方形);
- remove.bg 或 RemovePhotos 改成透明底;
- 在线图片压缩工具 尺寸压缩到 50x50;
- 上传到图床,复制链接到
url('')内即可。
增添到 /themes/hugo-theme-stack/assets/scss/custom.scss
//鼠标指针自定义,放在`static/img`内或者引用外部网站链接。
body{cursor:url(/img/pointer.cur), default;} //默认时的鼠标样式
a:hover{cursor:url(/img/link.cur), pointer;} //指向链接时的鼠标样式
button:hover {cursor: url(''), pointer;} //代码复制按钮
input {cursor: url(''), text;} //评论框
// 如 {cursor: url('https://cdn.jsdelivr.net/gh/Tomotoes/images/blog/default.cur'), default;}
20230915
目录按钮
参考文章 → 93 Beautiful CSS box-shadow examples
移动端没有目录很难受,在 ChatGPT 的帮助下弄了个按钮,点击就可展开/关闭目录,很舒适。
替换 /themes/hugo-theme-stack/layouts/partials/widget/toc.html
{{ if (.Context.Scratch.Get "TOCEnabled") }}
<!-- 如果 .Context.Scratch 中包含名为 "TOCEnabled" 的值,则执行以下代码 -->
<button id="toggle-toc">Toc</button>
<!-- 创建一个按钮,用于展开和收起目录 -->
<section class="widget archives" id="toc-container">
    <!-- 创建一个带有 "archives" 类的区块,并添加一个唯一的 ID 用于操作 -->
    <h2 class="widget-title section-title">{{ T "article.tableOfContents" }}</h2>
    <!-- 创建一个带有 "widget-title" 和 "section-title" 类的标题区块,并显示 "article.tableOfContents" 的本地化内容 -->

    <div class="widget--toc">
        <!-- 创建一个带有 "widget--toc" 类的目录区块 -->
        {{ .Context.TableOfContents }}
        <!-- 显示文章的目录内容 -->
    </div>
</section>
{{ end }}

<style>
    #mulu {
        z-index: 9999;
    }

    #toc-container {
        display: none;
        /* 初始时隐藏目录 */
        position: fixed;
        /* 使用固定定位,使其固定在视口中 */
        bottom: 21%;
        /* 距离视口顶部的距离,可以根据需要进行调整 */
        right: 60px;
        /* 距离视口右侧的距离,可以根据需要进行调整 */
        background-color: var(--card-background);
        /* 可选:设置背景颜色 */
        padding: 10px;
        /* 可选:添加一些内边距 */
        border: 1px solid #96979a50;
        border-radius: var(--card-border-radius);
        box-shadow: rgba(14, 30, 37, 0.12) 0px 2px 4px 0px, rgba(14, 30, 37, 0.32) 0px 2px 16px 0px;
        /* 可选:添加边框样式 */
        z-index: 9998 !important;
        /* 可选:设置 z-index 以确保它显示在其他元素之上 */
        max-height: 80vh;
        /* 设置最大高度为视口高度的 80% */
        overflow-y: auto;
        /* 添加垂直滚动条,以便在内容溢出时滚动 */
        width: auto;
        /* 让容器的宽度自适应内容 */
        max-width: 290px;
    }

    #toggle-toc {
        position: fixed;
        bottom: 22%;
        right: 20px;
        padding: 10px 10px;
        z-index: 9998 !important;
        border: 0px solid #96979a50;
        border-radius: 7px;
        box-shadow: var(--shadow-l1);
        background-color: #00640010;
        color: #34495e;
        /* 确保按钮在其他元素之上 */
        /* 其他样式保持不变 */
        display: block;
        /* 显示按钮 */
        margin-bottom: 10px;
        cursor: pointer;
        font-size: 1.2rem;
        /* 可选:改变鼠标光标以指示按钮是可点击的 */
    }

    .widget--toc #TableOfContents {
        overflow-x: auto;
        max-height: 66vh;
        width: auto;
    }

    @media screen and (max-width: 768px) {
        #toggle-toc {
            bottom: 100px;
        }
    }
</style>

<script>
    // 获取按钮和目录的元素
    var toggleButton = document.getElementById('toggle-toc');
    var tocContainer = document.getElementById('toc-container');
    var scrollThreshold = 200; // 设置滚动显示的阈值

    // 监听页面滚动事件
    window.addEventListener('scroll', function() {
        // 获取当前滚动位置
        var scrollY = window.scrollY || window.pageYOffset;

        // 检查滚动位置是否超过阈值
        if (scrollY >= scrollThreshold) {
            // 显示按钮
            toggleButton.style.display = 'block';
        } else {
            // 隐藏按钮
            toggleButton.style.display = 'none';
        }
    });

    // 添加点击事件处理程序
    toggleButton.addEventListener('click', function() {
        // 切换目录的显示状态
        if (tocContainer.style.display === 'none' || tocContainer.style.display === '') {
            tocContainer.style.display = 'block';
        } else {
            tocContainer.style.display = 'none';
        }
    });
    // 当鼠标悬浮在按钮上时显示目录
    toggleButton.addEventListener('mouseover', function() {
        tocContainer.style.display = 'block';
    });


    // 添加点击页面空白处的事件处理程序
    document.addEventListener('click', function(event) {
        // 检查点击事件是否发生在目录容器之外,并且不是按钮本身
        if (!tocContainer.contains(event.target) && event.target !== toggleButton) {
            // 点击发生在目录容器之外,隐藏目录容器
            tocContainer.style.display = 'none';
        }
    });
</script>
菜单按钮
常驻菜单按钮,转换界面很方便👍
增添到 /themes/hugo-theme-stack/assets/scss/partials/menu.scss
// 调整透明度并固定在页面右上角
.hamburger {
    opacity: 0.1;
}
.hamburger-box {
    position: fixed;
    right: 20px;
}
//调整菜单项字体间距
.menu.show {
    display: none;
    position: fixed;
    top: 12%;
    right: 20px;
    font-size: 1rem;
    background-color: var(--card-background);
    padding: 10px;
    border: 1px solid #96979a50;
    border-radius: var(--card-border-radius);
    box-shadow: rgba(14, 30, 37, 0.12) 0px 2px 4px 0px, rgba(14, 30, 37, 0.32) 0px 2px 16px 0px;
    z-index: 9999 !important;
    max-height: 80vh;
    overflow-y: auto;
    /* 添加垂直滚动条,以便在内容溢出时滚动 */
    width: auto;
    /* 让容器的宽度自适应内容 */
    max-width: 290px;
    grid-gap: 10px;
}
@media (max-width: 898px) {
     :root {
        --menu-icon-separation: 8px;
    }
    .menu li svg {
        stroke-width: 1.33;
        width: 20px !important;
        height: 20px;
    }
}
单页相册分类
单页相册 → [hugo stack 主题美化#单页相册]
原理就是文件名包含特定词语,就只显示这些图片,其他图片隐藏但是占位。
增添到 /layouts/_default/photos.html
<!-- 添加到 <div class="gallery-photos page"> 前方 -->
<div class="button-group">
<button class="filter-button" data-category="-"> All </button>
<button class="filter-button" data-category="临摹">#临摹</button>
<button class="filter-button" data-category="手工">#手工</button>
<button class="filter-button" data-category="石塑粘土">#石塑粘土</button>
</div>
<!-- 添加到 <style> </style> 中间 -->
.button-group {
display: flex;
flex-direction: row;
gap: 18px;
justify-content: center;
}
.filter-button {
padding: 8px 8px;
width: auto;
background-color: var(--card-background);
color: #57bd8f;
border: none;
border-radius: 5px;
cursor: pointer;
transition: background-color 0.3s ease;
}
.filter-button:hover {
color: #5e88f7;
}
.selected-button {
background-color: #CCE8CF;
color: #000000;
/* 选中项的颜色 */
}
<!-- 添加到 <script> </script> 中间 -->
document.addEventListener('DOMContentLoaded', () => {
const filterButtons = document.querySelectorAll('.filter-button');
const galleryPhotos = document.querySelectorAll('.gallery-photo');
filterButtons.forEach(button => {
button.addEventListener('click', () => {
const category = button.getAttribute('data-category');
// 隐藏所有照片
galleryPhotos.forEach(photo => {
photo.style.visibility = 'hidden';
});
// 显示符合特定词语的照片
galleryPhotos.forEach(photo => {
const imageName = photo.querySelector('.photo-img').getAttribute('alt');
if (imageName.includes(category)) {
photo.style.visibility = 'visible';
}
});
// 移除所有按钮的选中状态
filterButtons.forEach(btn => {
btn.classList.remove('selected-button');
});
// 将当前点击的按钮标记为选中状态
button.classList.add('selected-button');
});
});
});