后续在这里 → [hugo stack 主题美化 2]
20230914
页面背景
参考文章 → 【Web】博客、个人网站背景美化 咲奈的博客
飞舞樱花、三角体、粒子
加载进度条
参考文章 → 博客切换到STACK 主题 (skfwe.cn)
效果如下:

增添到 /themes/hugo-theme-stack/layouts/partials/footer/custom.html
<script src="https://cdn.jsdelivr.net/gh/zhixuan2333/[email protected]/js/nprogress.min.js" integrity="sha384-bHDlAEUFxsRI7JfULv3DTpL2IXbbgn4JHQJibgo5iiXSK6Iu8muwqHANhun74Cqg" crossorigin="anonymous"></script>
<link rel="stylesheet" href="https://cdn.jsdelivr.net/gh/zhixuan2333/[email protected]/css/nprogress.css" integrity="sha384-KJyhr2syt5+4M9Pz5dipCvTrtvOmLk/olWVdfhAp858UCa64Ia5GFpTN7+G4BWpE" crossorigin="anonymous" />
<script>
    NProgress.start();
    document.addEventListener("readystatechange", () => {
        if (document.readyState === "interactive") NProgress.inc(0.8);
        if (document.readyState === "complete") NProgress.done();
    });
</script>
20230913
卡片式链接 shortcode
参考文章 → 短代码 - Hugo Theme Luna (imiku.me)
参考文章 → Hugo|为博客添加网页预览 Shortcode (norevi.icu)
图片没给定的话,就通过 thumbnail.ws
获取网页快照。
鼓捣了一天,还是没搞明白咋获取网站图标,以后再搞吧 😴
文章里输入(去掉 \ ):
{\{< link-card name="hugo-theme-luna" desc="A simple, performance-first, SEO-friendly Hugo theme hugo-theme-luna." link="https://github.com/Ice-Hazymoon/hugo-theme-luna" img="https://repository-images.githubusercontent.com/486781027/dc31a9ab-66d1-49b8-a225-4f85f2329f2e" >}\}
效果如下:

新建 /themes/hugo-theme-stack/layouts/shortcodes/link-card.html
注意第 20 行需要填入自己的 api :【Sign up】—— 邮箱验证 —— 【Members】/ 邮件 就能看到 api。
{{- $link := .Get "link" -}}{{- $img := .Get "img" -}}
<a1 href="{{ $link }}" target="_blank">
    <div class="zhengti">
        <a href="{{ $link }}">
            <div class="wenzi">
                <div class="linkk">
                    <div class="namee">{{- .Get "name" -}}</div>
                    {{- if (.Get "desc") -}}
                    <div class="descc">{{- .Get "desc" -}}</div>
                    {{- end -}}
                </div>
        </a>
        {{- if (.Get "link") -}}
        <div class="linktext">{{- .Get "link" -}}</div>

        </div>
        <div class="daimg">
            {{- if (.Get "img") -}}
            <img class="link-card-img" loading="lazy" src="{{- $img -}}" alt="" /> {{ else }}
            <img class="link-card-img" loading="lazy" src="https://api.thumbnail.ws/api/ab41148c7048bd95441b7b09816cbd5db1ed220134d3/thumbnail/get?width=720&url={{ $link }}" alt="" /> {{- end -}}{{- end -}}
        </div>

    </div>
</a1>

<style>
    a1 {
        display: flex;
        flex-direction: column;
    }

    .zhengti {
        margin: auto;
        padding-top: 4%;
        padding-right: 4%;
        padding-bottom: 4%;
        padding-left: 4%;
        width: 100%;
        display: flex;
        align-items: left;
        flex-direction: row;
        border: 1px solid #e5e7eb;
        border-radius: 20px;
        background-color: #ffffff;
        transition: border 0.3s ease-in-out;
        box-shadow: 2px 4px 16px rgba(0, 0, 0, .05);
    }

    .wenzi {
        display: flex;
        align-items: left;
        flex-direction: column;
        flex: 2;
    }

    .zhengti:hover {
        transform: scale(1.03);
        box-shadow: 2px 4px 16px rgba(0, 0, 0, .05);
    }

    .linkk {
        display: flex;
        flex-direction: column;
    }

    .iconn {
        display: flex;
        align-items: center;
    }

    .iconn1 {
        width: 1.2em;
        height: 1.2em;
        margin-right: 0.5em;
        margin-bottom: 0.2em;
    }

    .namee {
        font-size: 1.7rem;
        font-weight: 600;
        margin-bottom: 0.5rem;
        color: var(--card-text-color-main);
    }

    .descc {
        font-size: 1.3rem;
        color: #9ca3af;
        margin-bottom: 0.5rem;
    }

    .linktext {
        font-size: 0.9rem;
        color: #9ca3af;
    }
    /* 图标样式 */

    .link-card-icoon {
        width: 16px;
        height: 16px;
        margin-right: 0.5rem;
    }
    /* 图片样式 */

    .daimg {
        display: flex;
        flex-direction: row;
        flex: 1;
        align-self: right;
    }

    .link-card-img {
        display: block;
        height: auto;
        max-height: 200px;
        width: 100%;
        /* 宽度充满容器 */
        object-fit: cover;
        max-width: 50%;
        margin-right: 2px;
        border-radius: 0.25rem;
    }

    a1:hover {
        background-color: var(--color-zoom-bg);
        border: 1px solid var(--theme);
    }

    @media (max-width:900px) {
        a1 {
            max-height: 25em;
            overflow-y: auto;
            padding-right: 4%;
        }
        .zhengti {
            display: flex;
            flex-direction: column;
        }
    }

    [data-scheme="dark"] {
        .zhengti {
            background-color: #161b22;
            border: 1px solid #30363d;
        }
        .descc {
            color: #9ca3af;
        }
        .linktext {
            color: #9ca3af;
        }
    }
</style>
聊天气泡 shortcode
纯文字,无头像。
已知问题:iPhone 上夜间颜色无法显示,还是白天配色。
文章里输入(去掉 \ ):
{\{< chat position="left" name="John Doe" timestamp="2023-09-12 14:30">}\}
这是左边的消息内容。
{\{< /chat >}\}

{\{< chat position="right" name="Alice" timestamp="2023-09-12 14:45" >}\}
这是右边的消息内容,测试长长长长长长长长长长长长长长长长长长长长长长长长度。
{\{< /chat >}\}
效果如下:

新建 /themes/hugo-theme-stack/layouts/shortcodes/chat.html
{{ if eq (.Get "position") "left" }}
<div class="chat --other">
<div class="chat__inner">
<div class="chat__meta">{{ .Get "name" }} {{ .Get "timestamp" }}</div>
<div class="chat__text">
{{ .Inner }}
</div>
</div>
</div>
{{ else if eq (.Get "position") "right" }}
<div class="chat --self">
<div class="chat__inner">
<div class="chat__meta" style="text-align: right;">{{ .Get "timestamp" }} {{ .Get "name" }}</div>
<div class="chat__text">
{{ .Inner }}
</div>
</div>
</div>
{{ end }}
<style>
.chat {
margin: 10px;
padding: 10px;
position: relative;
/* 添加相对定位,以便定位尖角箭头 */
transition: transform 0.2s;
/* 添加过渡效果,使放大平滑 */
max-width: 80%;
min-width: 15%;
}
.chat:hover {
transform: scale(1.05);
}
.chat.--self {
text-align: left;
background-color: #ecf5ff;
color: #000000;
border-radius: 15px;
width: fit-content;
margin-left: auto;
}
/* 尖角箭头 */
.chat.--self::before {
content: "";
position: absolute;
right: -18px;
/* 调整箭头位置 */
bottom: 5px;
transform: translateY(-50%);
border-width: 15px 0 0 20px;
border-style: solid;
border-color: transparent transparent transparent #ecf5ff;
/* 箭头颜色与对话框背景颜色一致 */
}
/* 左边对话框样式 */
.chat.--other {
text-align: left;
background-color: #ffecec;
color: #333;
border-radius: 15px;
position: relative;
width: fit-content;
}
/* 左边对话框的尖角箭头 */
.chat.--other::before {
content: "";
position: absolute;
left: -18px;
bottom: 5px;
transform: translateY(-50%);
border-width: 15px 20px 0 0;
border-style: solid;
border-color: transparent #ffecec transparent transparent;
}
/* 消息元数据样式(名称和时间戳) */
.chat__meta {
font-weight: bold;
font-size: 0.67em;
color: #707070;
margin-bottom: 5px;
}
/* 消息文本样式 */
.chat__text {
font-size: 0.9em;
margin-left: 10px;
word-break: break-all;
}
[data-scheme="dark"] {
.chat.--self {
color: #fefefe;
background-color: #253958;
}
.chat.--self::before {
border-color: transparent transparent transparent #253958;
}
.chat.--other {
color: #fefefe;
background-color: #1a1a1a;
}
.chat.--other::before {
border-color: transparent #1a1a1a transparent transparent;
}
.chat__meta {
color: #b1b1b1;
}
}
</style>
macos 代码块
参考文章 → (3)Stack主题的自定义 (linsnow.cn)
这篇文章还有【返回顶部】按钮的教程。
效果如下:
20230912
长毛象 shortcode
参考文章 → 来写一些好玩的 Hugo 短代码吧 (irithys.com)
Spotify
效果如下:

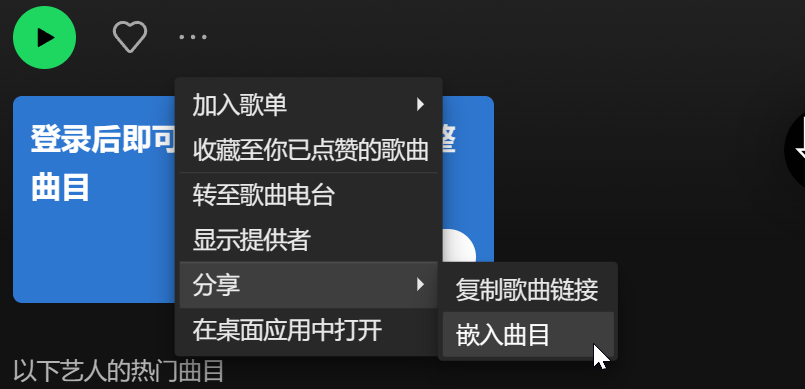
网易云音乐 shortcode
参考文章 → Hugo | 在 Stack 主题上可行的短代码们 (sleepymoon.cyou)
效果如下:

摘录引用 shortcode
参考文章 → Hugo | 在 Stack 主题上可行的短代码们 (sleepymoon.cyou)
效果如下:

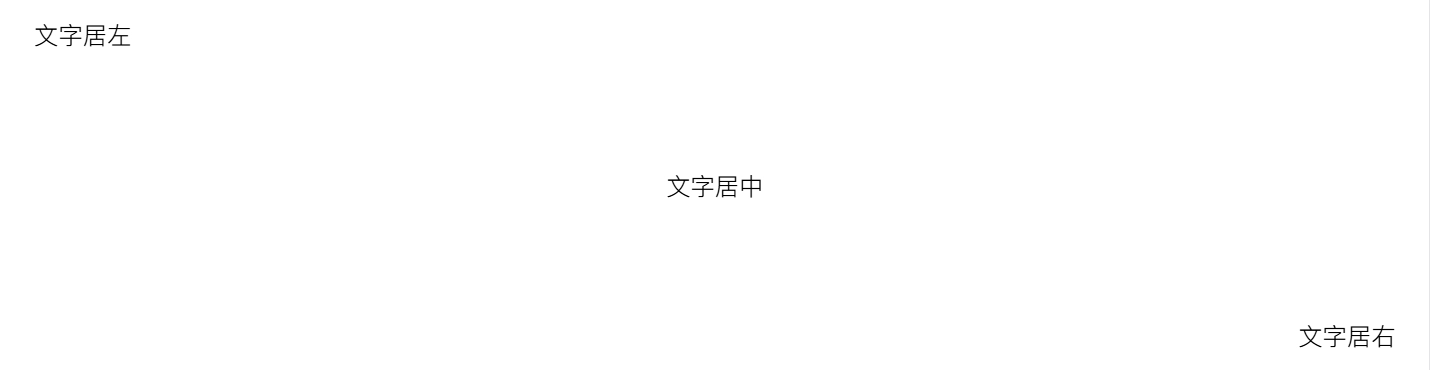
文字对齐 shortcode
参考文章 → Hugo | 在 Stack 主题上可行的短代码们 (sleepymoon.cyou)
文章里输入:
{\{< align left "文字居左" >}\}
{\{< align center "文字居中" >}\}
{\{< align right "文字居右" >}\}
效果如下:
文字渐变
参考文章 → Hugo | 在 Stack 主题上可行的短代码们 (sleepymoon.cyou)
文章里输入:
<font class="colorfulfont"> 我挑的配色很好看吧!<br>好喜欢蓝色(再次)(再次)<br> 但总之换行的话就加个空标签。</font>
效果如下:

文本黑幕
参考文章 → Hugo | 在 Stack 主题上可行的短代码们 (sleepymoon.cyou)
文章里输入:
<span class="shady">数据删除!数据删除!<br>但总之换行的话就加个空标签。</span>
效果如下:

高斯模糊
参考文章 → Hugo | 在 Stack 主题上可行的短代码们 (sleepymoon.cyou)
文章里输入:
<span class="blur">一些手动打码效果!<br>但总之换行的话就加个空标签。</span>
效果如下:

20230911
说说 Artitalk
参考文章 → ■■Loading:《hugo 装修日志 04》■■ - 天堂错误文件
参考文章 → 使用文档 | Artitalk.js
效果如下:说说
图片轮播 shortcode
参考文章 → Hugo | 在文章中插入轮播图片 | 小球飞鱼 (mantyke.icu)
文章里输入(去掉 \ ):
{/{< imgloop "https://cdn.jsdelivr.net/gh/rieleg/pics/imgs/202309111949273.jpg,https://cdn.jsdelivr.net/gh/rieleg/pics/imgs/202309111949273.jpg,https://cdn.jsdelivr.net/gh/rieleg/pics/imgs/202309111949273.jpg,https://cdn.jsdelivr.net/gh/rieleg/pics/imgs/202309111949273.jpg" >}/}
效果如下:

隐藏文字 shortcode
参考文章 → 防止剧透的隐藏文字 – Mogeko’s Blog
文章里输入(去掉 \ ):
这是一段{\{< spoiler >}\} 隐藏文字 {\{< /spoiler >}\}
效果如下:

缩写 shortcode
参考文章 → 短代码 - Hugo Theme Luna (imiku.me)
文章里输入(去掉 \ ):
{\{< abbr "AWSL" "啊我死了" >}\}
效果如下:

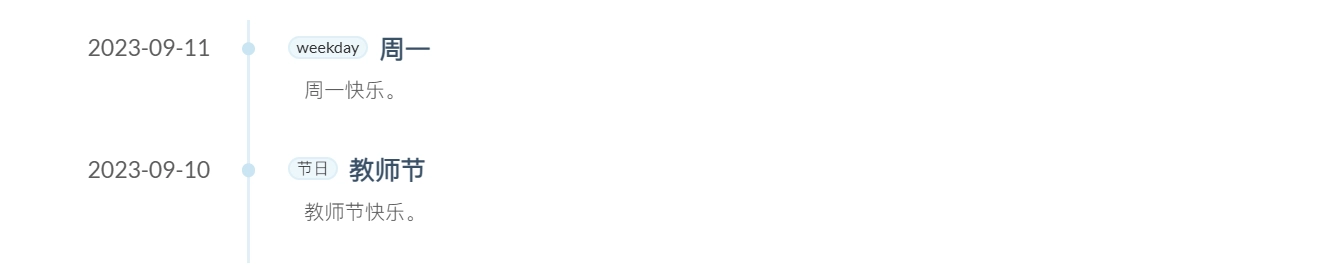
时间轴 shortcode
参考文章 → Hugo 和 PaperModX 的折腾记录 | wananaiko
文章里输入(去掉 \ ):
{\{< timeline date="2023-09-11" title="周一" description="周一快乐。" tags="weekday" url="/" >}\}{\{< timeline date="2023-09-10" title="教师节" description="教师节快乐。" tags="节日" >}\}
效果如下:
新建 /themes/hugo-theme-stack/layouts/shortcodes/timeline.html
{{- $date := .Get "date" -}} {{- $title := .Get "title" -}} {{- $description := .Get "description" -}} {{- $tags := .Get "tags" -}}{{- $url := .Get "url" -}}

<div class="timeline__row">
    <div class="timeline__time">
        <div class="timeline__time">{{ $date }}</div>
        <div class="timeline__split-line"></div>
    </div>
    <div class="timeline__content">
        <div class="timeline__tags">
            {{- with split $tags ", " -}} {{- range . }}{{- if eq . "样式" }}
            <span class="timeline__tag timeline__tag-style">{{ . }}</span> {{- else if eq . "文章" }}
            <span class="timeline__tag timeline__tag-article">{{ . }}</span> {{- else if eq . "页面" }}
            <span class="timeline__tag timeline__tag-page">{{ . }}</span> {{- else }}
            <span class="timeline__tag">{{ . }}</span> {{- end }} {{- end }} {{- end }}
        </div>
        <a href="{{ $url }}">
            <div class="timeline__title">{{ $title }}</div>
        </a>
        <!-- title 可点击,默认就是跳转时间轴所在页 -->
        <div class="timeline__description">
            {{ $description }}
        </div>
    </div>
</div>


<style>
    .timeline {
        display: flex;
        flex-direction: column;
    }

    .timeline__row {
        display: flex;
        padding-left: 4%;
        height: 90px;
    }

    .timeline__time {
        flex: 0 0 110px;
        color: #5d5d5d;
        font-size: 17px;
        text-transform: uppercase;
        position: relative;
        display: flex;
        flex-direction: column;
        align-items: center;
        padding: 0.5rem 0;
    }

    .timeline__time-text {
        margin: 0;
    }

    .timeline__split-line {
        position: absolute;
        top: 0.5rem;
        right: -20px;
        height: 100%;
        width: 2px;
        background-color: #84c4e240;
        z-index: 0;
    }

    .timeline__split-line:before {
        content: "";
        position: absolute;
        top: 24%;
        right: -4px;
        transform: translateY(-50%);
        width: 10px;
        height: 10px;
        background-color: #c9e5f2;
        box-shadow: 0 0 0 4px var(--theme);
        border-radius: 50%;
        border: 0px solid #84c4e2;
        z-index: -1;
    }

    .timeline__content {
        flex: 1;
        margin-left: 4.5rem;
        padding: 0.5rem 0 1.2rem 0;
    }

    .timeline__title {
        margin: 0;
        margin-bottom: 2px;
        padding-top: 3px;
        margin-left: 0.5rem;
        color: var(--content);
        font-family: var(--font-family-teshu);
        font-size: 19px;
        font-weight: 600;
        width: fit-content;
        display: inline-block;
        vertical-align: middle;
        /* 垂直居中对齐 */
    }

    .timeline__tags {
        display: inline-block;
        padding: 0;
        margin-left: 0.3rem;
        align-items: center;
        gap: 0.3rem;
    }

    .timeline__tag {
        display: inline-block;
        color: var(--secondary);
        background-color: #84c4e230;
        border: 1.5px solid #84c4e230;
        border-radius: 999px;
        padding: 0rem 0.5rem;
        font-size: 12px;
        white-space: nowrap;
        line-height: 1.4rem;
        opacity: 0.8;
        vertical-align: middle;
        /* 垂直居中对齐 */
    }

    .timeline__description {
        font-size: 15px;
        line-height: 1.6;
        color: #5d5d5d;
        overflow: hidden;
        text-overflow: ellipsis;
        margin: 0.5rem 0 0.4rem 1.5rem;
        /* 添加 1.5rem 的左侧内边距 */
    }
    /* 为类名为 "timeline__tag-style" 的标签定义颜色 */

    .timeline__tag-style {
        background-color: #c581da;
        /* 替换为你希望的颜色 */
        border-color: #c581da;
        /* 与背景色相同或不同,根据需要自定义 */
        color: #FFFFFF;
        /* 根据需要选择文本颜色 */
    }
    /* 为类名为 "timeline__tag-article" 的标签定义颜色 */

    .timeline__tag-article {
        background-color: #92d392;
        /* 替换为你希望的颜色 */
        border-color: #92d392;
        /* 与背景色相同或不同,根据需要自定义 */
        color: #000000;
        /* 根据需要选择文本颜色 */
    }
    /* 为类名为 "timeline__tag-page" 的标签定义颜色 */

    .timeline__tag-page {
        background-color: #707070;
        /* 替换为你希望的颜色 */
        border-color: #707070;
        /* 与背景色相同或不同,根据需要自定义 */
        color: #FFFFFF;
        /* 根据需要选择文本颜色 */
    }

    @media screen and (max-width: 768px) {
        .timeline__time {
            font-size: 14px;
            /* 在小屏幕上使用较小的字体大小 */
        }
        .timeline__title {
            font-size: 16px;
            /* 在小屏幕上使用较小的字体大小 */
        }
        .timeline__description {
            font-size: 14px;
            /* 在小屏幕上使用较小的字体大小 */
        }
    }
</style>
20230909
标题样式
参考文章 → 木木木木木 (immmmm.com) 网站源码
效果如下: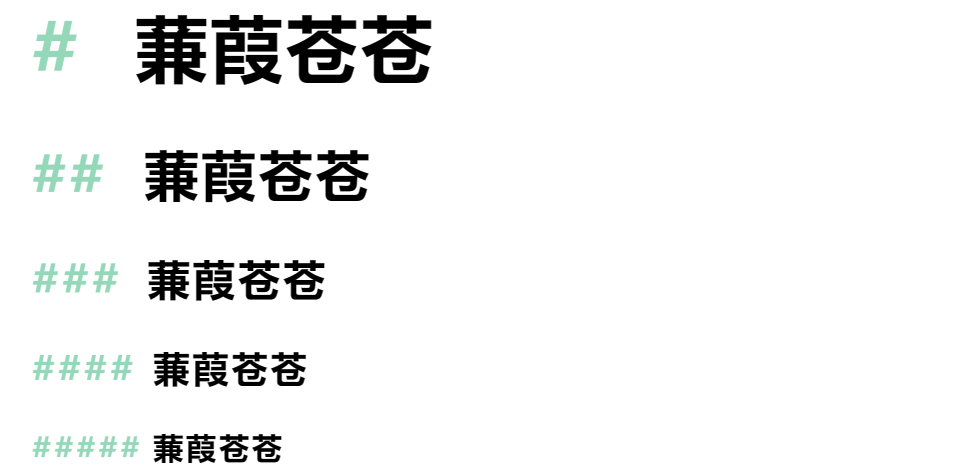
20230908
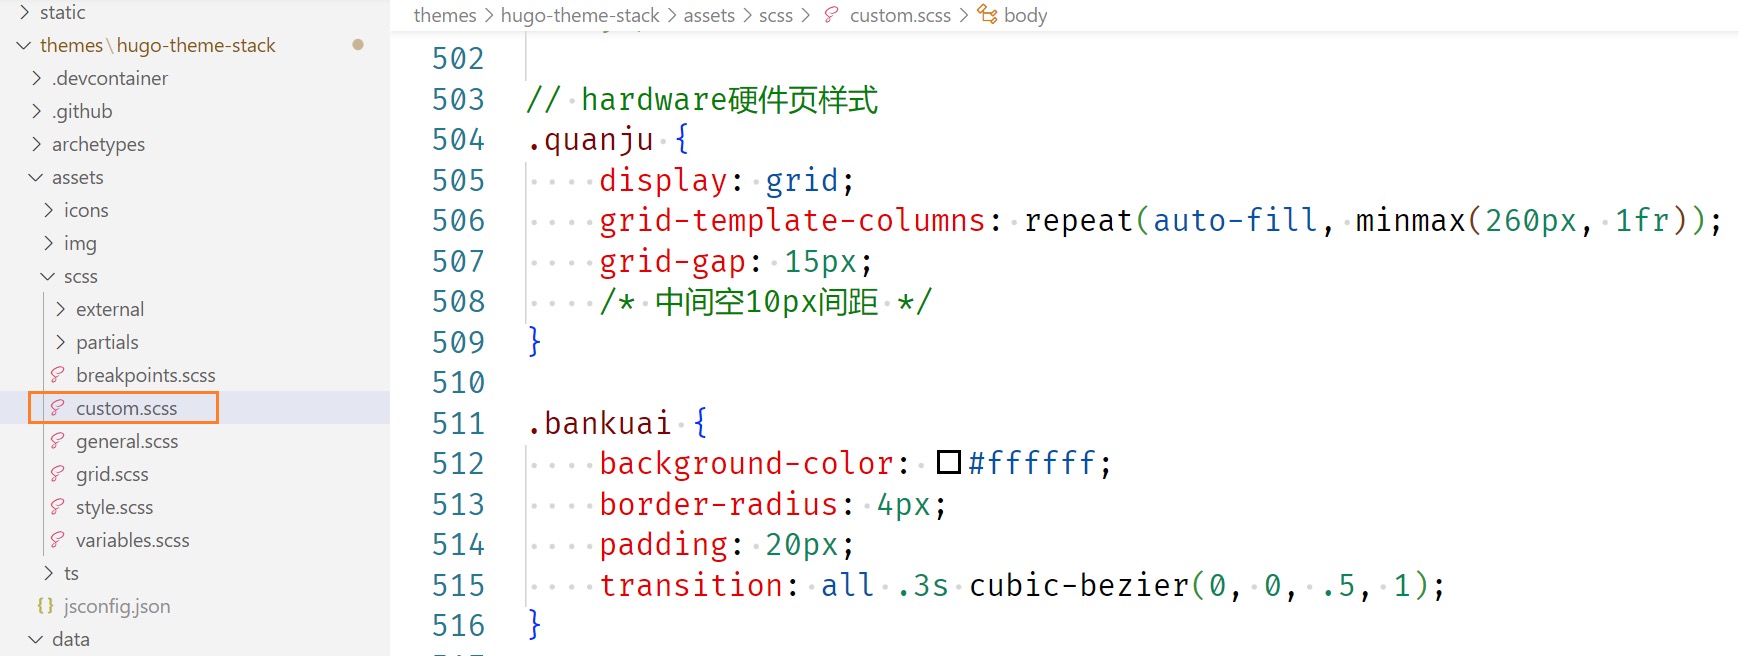
硬件页面
参考 → 空白Koobai
网站源码
在线抠图网站 → remove.bg
效果如下:硬件
复制源码中对应的 json 文件和 html 文件,再复制相应的 scss。
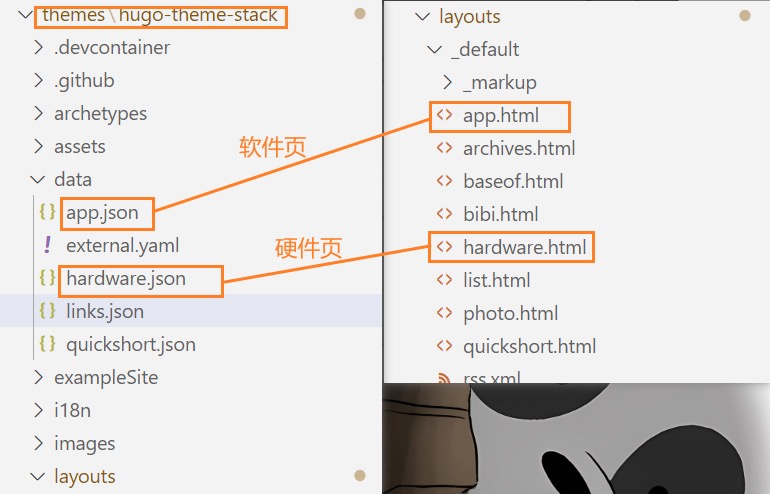
软件页面
参考 → 空白Koobai 网站源码
效果如下:[软件收集]
步骤同上。
20230906
shortcode 汇总
参考文章 → Hugo Shortcode 汇总页面 | wananaiko
json 输入带双引号的内容时会报错,引号前加转义符 \"\" 就可以避免这种情况了。
效果如下:[Shortcode]
NeoDB shortcode
参考文章 → Hi, NeoDB :: 木木木木木 (immmmm.com)
文章里输入(去掉 \ ):
{\{< neodb "https://neodb.social/tv/season/5LhjwMXRPTxoGfRl4ftQj2" >}\}
\{\{< neodb "https://book.douban.com/subject/36328704/" >\}\}
下载 源码
到 /themes/hugo-theme-stack/layouts/shortcodes/ 下。
增添到 /themes/hugo-theme-stack/assets/scss/custom.scss
    /*neodb*/

    .db-card {
        margin: 2rem 3rem;
        background: #33669930;
        border-radius: 8px;
        box-shadow: 0 1px 2px rgba(0, 0, 0, 0.25), 0 0 1px rgba(0, 0, 0, 0.25);
    }

    .db-card-subject {
        display: flex;
        align-items: flex-start;
        line-height: 1.6;
        padding: 12px;
        position: relative
    }
    .dark-mode .db-card {
        background: #252627
    }

    .db-card-content {
        flex: 1 1 auto
    }

    .db-card-post {
        width: 96px;
        margin-right: 15px;
        display: flex;
        flex: 0 0 auto
    }

    .db-card-title {
        margin-bottom: 5px;
        font-size: 18px
    }

    .db-card-title a {
        text-decoration: none!important
    }

    .db-card-abstract,
    .db-card-comment {
        font-size: 14px;
        overflow: hidden;
        max-height: 3rem
    }

    .db-card-cate {
        position: absolute;
        top: 0;
        right: 0;
        background: #f99b0170;
        padding: 1px 8px;
        font-size: small;
        font-style: italic;
        border-radius: 0 8px 0 8px;
        text-transform: capitalize
    }

    .db-card-post img {
        width: 96px!important;
        height: 96px!important;
        border-radius: 4px;
        -o-object-fit: cover;
        object-fit: cover
    }

    .rating {
        margin: 0 0 5px;
        font-size: 13px;
        line-height: 1;
        display: flex;
        align-items: center
    }

    .rating .allstardark {
        position: relative;
        color: #f99b01;
        height: 16px;
        width: 80px;
        background-size: auto 100%;
        margin-right: 8px;
        background-repeat: repeat;
        background-image: url(data:image/svg+xml;base64,PHN2ZyBjbGFzcz0iaWNvbiIgdmlld0JveD0iMCAwIDEwMjQgMTAyNCIgeG1sbnM9Imh0dHA6Ly93d3cudzMub3JnLzIwMDAvc3ZnIiB3aWR0aD0iMzIiIGhlaWdodD0iMzIiPjxwYXRoIGQ9Ik05MDguMSAzNTMuMWwtMjUzLjktMzYuOUw1NDAuNyA4Ni4xYy0zLjEtNi4zLTguMi0xMS40LTE0LjUtMTQuNS0xNS44LTcuOC0zNS0xLjMtNDIuOSAxNC41TDM2OS44IDMxNi4ybC0yNTMuOSAzNi45Yy03IDEtMTMuNCA0LjMtMTguMyA5LjMtMTIuMyAxMi43LTEyLjEgMzIuOS42IDQ1LjNsMTgzLjcgMTc5LjEtNDMuNCAyNTIuOWMtMS4yIDYuOS0uMSAxNC4xIDMuMiAyMC4zIDguMiAxNS42IDI3LjYgMjEuNyA0My4yIDEzLjRMNTEyIDc1NGwyMjcuMSAxMTkuNGM2LjIgMy4zIDEzLjQgNC40IDIwLjMgMy4yIDE3LjQtMyAyOS4xLTE5LjUgMjYuMS0zNi45bC00My40LTI1Mi45IDE4My43LTE3OS4xYzUtNC45IDguMy0xMS4zIDkuMy0xOC4zIDIuNy0xNy41LTkuNS0zMy43LTI3LTM2LjN6TTY2NC44IDU2MS42bDM2LjEgMjEwLjNMNTEyIDY3Mi43IDMyMy4xIDc3MmwzNi4xLTIxMC4zLTE1Mi44LTE0OUw0MTcuNiAzODIgNTEyIDE5MC43IDYwNi40IDM4MmwyMTEuMiAzMC43LTE1Mi44IDE0OC45eiIgZmlsbD0iI2Y5OWIwMSIvPjwvc3ZnPg==)
    }

    .rating .allstarlight {
        position: absolute;
        left: 0;
        color: #f99b01;
        height: 16px;
        overflow: hidden;
        background-size: auto 100%;
        background-repeat: repeat;
        background-image: url(data:image/svg+xml;base64,PHN2ZyBjbGFzcz0iaWNvbiIgdmlld0JveD0iMCAwIDEwMjQgMTAyNCIgeG1sbnM9Imh0dHA6Ly93d3cudzMub3JnLzIwMDAvc3ZnIiB3aWR0aD0iMzIiIGhlaWdodD0iMzIiPjxwYXRoIGQ9Ik05MDguMSAzNTMuMWwtMjUzLjktMzYuOUw1NDAuNyA4Ni4xYy0zLjEtNi4zLTguMi0xMS40LTE0LjUtMTQuNS0xNS44LTcuOC0zNS0xLjMtNDIuOSAxNC41TDM2OS44IDMxNi4ybC0yNTMuOSAzNi45Yy03IDEtMTMuNCA0LjMtMTguMyA5LjMtMTIuMyAxMi43LTEyLjEgMzIuOS42IDQ1LjNsMTgzLjcgMTc5LjEtNDMuNCAyNTIuOWMtMS4yIDYuOS0uMSAxNC4xIDMuMiAyMC4zIDguMiAxNS42IDI3LjYgMjEuNyA0My4yIDEzLjRMNTEyIDc1NGwyMjcuMSAxMTkuNGM2LjIgMy4zIDEzLjQgNC40IDIwLjMgMy4yIDE3LjQtMyAyOS4xLTE5LjUgMjYuMS0zNi45bC00My40LTI1Mi45IDE4My43LTE3OS4xYzUtNC45IDguMy0xMS4zIDkuMy0xOC4zIDIuNy0xNy41LTkuNS0zMy43LTI3LTM2LjN6IiBmaWxsPSIjZjk5YjAxIi8+PC9zdmc+)
    }

    @media(max-width: 550px) {
        .db-card {
            margin: .8rem 1rem
        }
        .db-card-comment {
            display: none
        }
    }
20230905
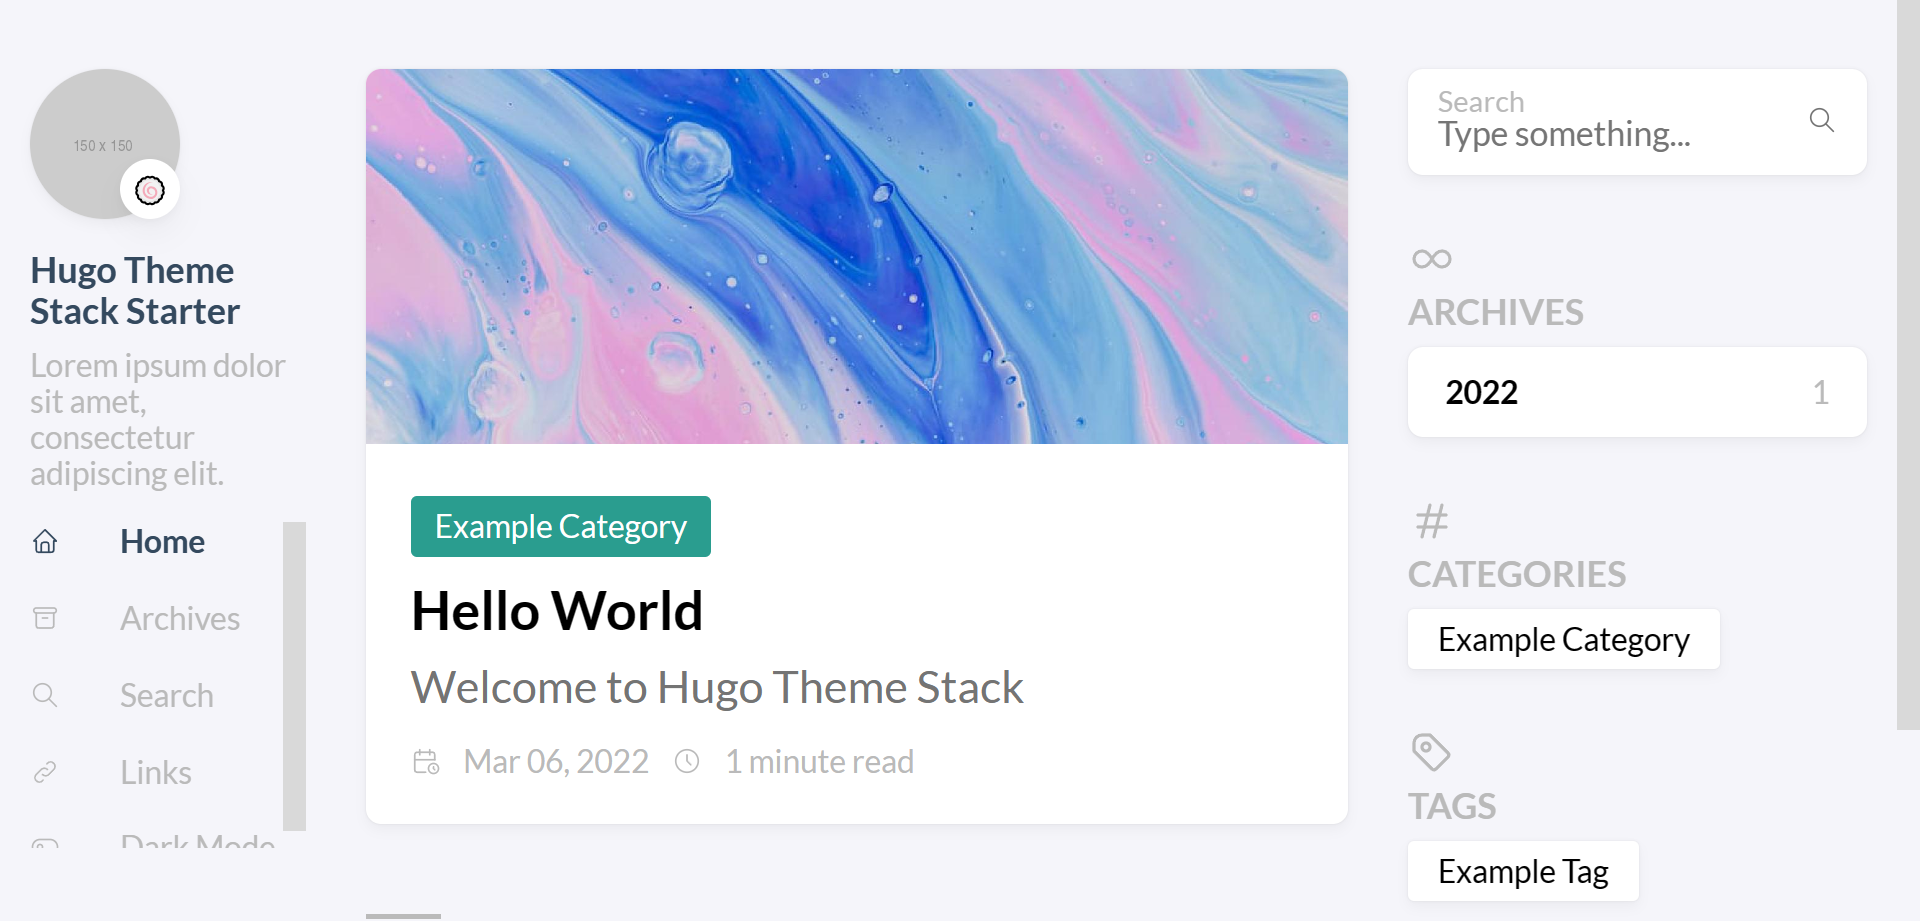
首页欢迎横幅
参考文章 → Hugo-theme-Stack 魔改美化 | Naive Koala (xalaok.top)
头像旋转
参考文章 → Hugo-theme-Stack 魔改美化 | Naive Koala (xalaok.top)
归档双栏
参考文章 → Hugo-theme-Stack 魔改美化 | Naive Koala (xalaok.top)
点击归档卡片,一页最多显示 5 篇文章,有一个空缺,很难受。
在 config.yaml 中修改就可以显示 6 篇文章:
paginate: 6
20230902
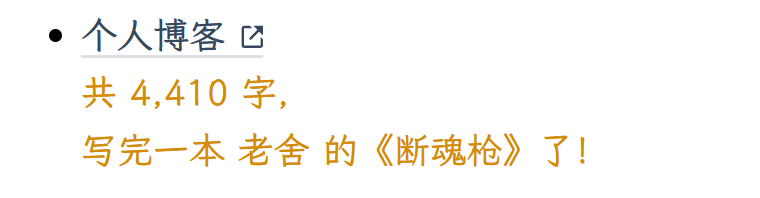
文章字数
参考文章 → 使用 Hugo 对博客的重建与 Stack 主题优化记录 (oxidane-uni.github.io)
记得在 config.yaml 中修改:
hasCJKLanguage: true
文章修改时间
参考文章 → 使用 Hugo 对博客的重建与 Stack 主题优化记录 (oxidane-uni.github.io)
20230823
行内代码颜色
增添到 /themes/hugo-theme-stack/assets/scss/custom.scss
/* 行内代码颜色 */
:root {
    // 行内代码背景色
    --code-background-color: #f8f8f8;
    // 行内代码前景色
    --code-text-color: #e96900;
}
20230821
隐藏主页按钮
参考文章 → Hugo|自定义 hugo-theme-Stack (ponder.lol)
增添到 /themes/hugo-theme-stack/assets/scss/custom.scss
/* 隐藏主页按钮 */
.menu {
    li:first-child {
        display: none;
    }
}
归档页隐藏图片
参考文章 → Hugo Stack 主题折腾笔记 (siae.me)
增添到 /themes/hugo-theme-stack/assets/scss/custom.scss
注意:也会隐藏友链图片
/* 分类页面隐藏文章图片,也会隐藏友链图片 */
.article-list--compact>article .article-image img,
.section-card .section-image img {
    display: none;
}
修改 h3 样式
参考文章 → Hugo|自定义 hugo-theme-Stack (ponder.lol)
增添到 /themes/hugo-theme-stack/assets/scss/partials/layout/article.scss
        h1,
        h2,
        h3,
        h4,
        h5,
        h6 {
            margin-inline-start: calc((var(--card-padding)) * -1);
            padding-inline-start: calc( var(--card-padding) - var(--heading-border-size));
        }
        h1,
        h2 {
            border-inline-start: var(--heading-border-size) solid var(--accent-color);
        }
        h3,
        h4,
        h5,
        h6 {
            border-inline-start: var(--heading-border-size) solid #f5f5fa;
        }
固定块高度
参考文章 → Hugo|自定义 hugo-theme-Stack (ponder.lol)
高度限制在 20em,并隐藏滚动条
增添到 /themes/hugo-theme-stack/assets/scss/partials/article.scss
    .article-content {
        .highlight {
            padding: var(--card-padding);
            pre {
                margin: initial;
                padding: var(--card-padding);
                margin: 0;
                width: auto;
                max-height: 20em;
                scrollbar-width: none;
                /* Firefox */
                &::-webkit-scrollbar {
                    display: none;
                    /* Chrome Safari */
                }
            }
        }
    }
20230814
友链样式 shortcode
参考文章 → 『Hugo』Hugo Styles (echosec.top)
文章里输入(去掉 \ ):
{\{< friend name="名称" url="网址" avatar="头像" bio="描述" >}\}{\{< friend name="名称" url="网址" avatar="头像" bio="描述" >}\}
效果如下:

鸭鸭邮箱
参考文章 → 我写博客都用了哪些工具? (irithys.com)
假设:对方邮件地址 [email protected]
,自己鸭鸭邮件地址 [email protected]
。
收到邮件,想要发件/回复(把 @ 替换为 _at_),收件人按如下格式填写:
[email protected]
聊天气泡
参考文章 → Hugo Stack主题装修笔记 (thirdshire.com)
站点头像居中
参考文章 → 博客情人节修改笔记 (irithys.com)
对照代码,增添几行即可 /themes/hugo-theme-stack/assets/scss/partials/sidebar.scss
目录去除圆点&修改选中样式
参考文章 → 为Hugo主题添加动态跟随目录Scrollspy效果 | 砖瓦匠杜重
新增到 /themes/hugo-theme-stack/assets/scss/partials/layout/article.scss
        #TableOfContents li,
        #TableOfContents ul {
            list-style-type: none;
        }
        #TableOfContents li li>a {
            font-size: 16px;
            font-weight: normal;
        }
        #TableOfContents li>a:hover,
        #TableOfContents li>a:focus {
            padding-left: 5px;
            color: #3376cd;
            text-decoration: none;
            background-color: transparent;
            border-left: 1px solid #3A6bA5;
        }
键盘标签
参考文章 → 『Hugo』Hugo Styles (echosec.top)
文章里输入(去掉 \ ):
「复制」功能的快捷键是:<\kbd>CTRL</kbd> + <\kbd>C</kbd>
效果如下:
「复制」功能的快捷键是:CTRL + C
增添到 /themes/hugo-theme-stack/assets/scss/custom.scss
// 键盘标签样式
kbd {
    margin: 0 .1em;
    padding: .1em .6em;
    font-size: .8em;
    color: #242729;
    background: #fff;
    border: 1px solid #adb3b9;
    border-radius: 3px;
    box-shadow: 0px 1px 0 rgba(12, 13, 14, 0.2), 0 0 0 2px #fff inset;
    white-space: nowrap;
    vertical-align: middle;
    font-family: monospace;
}
github shortcode
参考文章 → 用 Hugo 的 shortcodes 做 GitHub 卡片 | Yuanji’s Blog
文章里输入(去掉 \ ):
{\{< github title="gohugoio/hugo" detail="The world’s fastest framework for building websites." >}\}
效果如下:
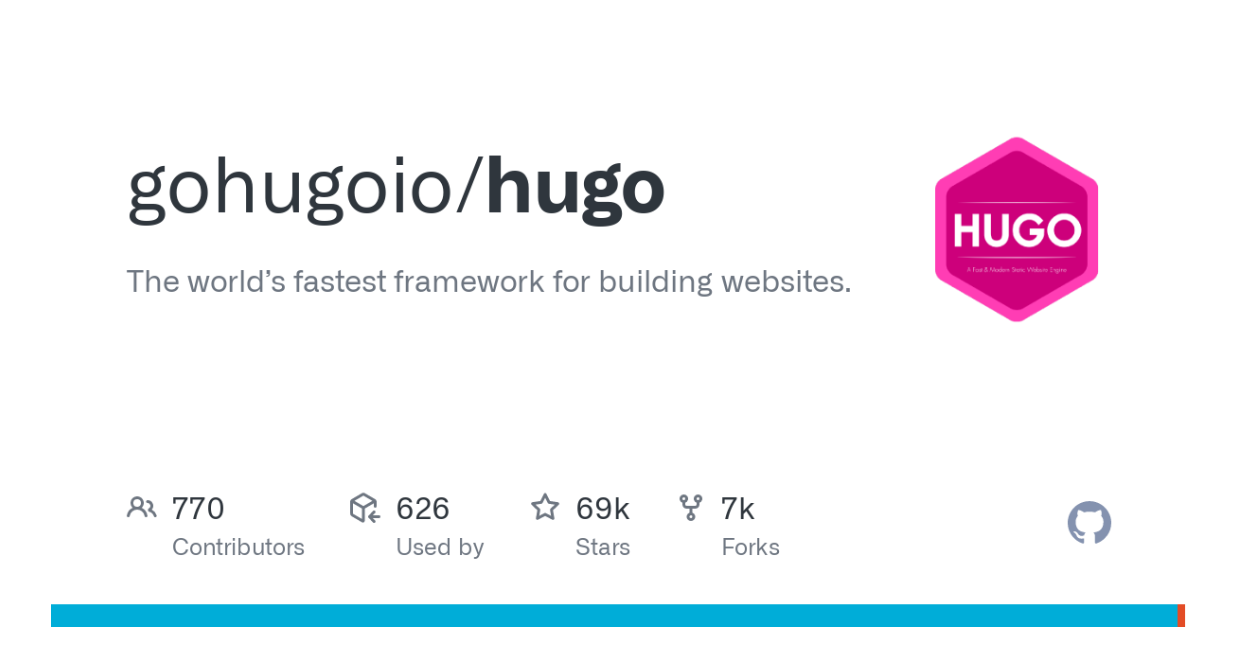
新建 /themes/hugo-theme-stack/layouts/shortcodes/github.html
{{ $title := .Get "title" }} {{ $detail := .Get "detail" }}
<article class="shortcode-card">
    <a href="https://github.com/{{ $title }}" target="_blank" rel="noopener">
        <header>
            <img alt="{{ $title }}" src="https://opengraph.githubassets.com/1/{{ $title }}" />
        </header>
    </a>
</article>
20230812
相册 shortcode
参考文章 → Hugo 添加相册页面::木木木木木
参考文章 → Hugo 相册短代码::木木木木木
参考文章 → 图片瀑布流折腾记::木木木木木
文章里输入(去掉 \ ):
<\gallery>
<img src="https://xxxxx.jpg">
<img src="">
<img src="">
<\/gallery>
</gallery></gallery>
# 双列瀑布流 本地图片,调取根目录 `/static/photos/1234` 内的图片并显示
{\{< gallery "photos/1234">}\}
单页相册
-
日常更新把图片(需按格式:日期 + 空格 + 图片名)丢到 /static/photos/ 中即可。
-
/content/photos.md 创建一个 md,好让 Hugo 生成页面
---
title: "我的相册"
layout: "photos"
---
- /layouts/_default/photos.html
注意图片后缀,测试的时候图片不显示,费了老大劲发现后缀是.PNG没识别,记得把文件后缀都改成.png😂
{{ define "main" }}
<div class="gallery-photos page">
  {{ range (sort (readDir "./static/photos") "Name" "desc")}}
    {{ if ( .Name | findRE "\\.(gif|jpg|jpeg|tiff|png|bmp|webp|avif|jxl)") }}
    <div class="gallery-photo">
      <img class="photo-img" loading='lazy' decoding="async" src="/photos/{{ .Name }}" alt="{{ .Name }}" />
      <span class="photo-title">{{ .Name | replaceRE "^[0-9 -]+(.*)[.].*" "$1"}}</span><span class="photo-time">{{ .Name | replaceRE "^([0-9-]+).*[.].*" "$1" }}</span>
    </div>
    {{ end }}
  {{ end }}
</div>

<style>
.gallery-photos{width:100%;}
.gallery-photo{width:24.9%;position: relative;visibility: hidden;overflow: hidden;}
.gallery-photo.visible{visibility: visible;animation: fadeIn 2s;}
.gallery-photo img{display: block;width:100%;border-radius:0;padding:4px;animation: fadeIn 1s;cursor: pointer;transition: all .4s ease-in-out;}
.gallery-photo span.photo-title,.gallery-photo span.photo-time{background: rgba(0, 0, 0, 0.3);padding:0px 8px;font-size:0.9rem;color: #fff;display:none;animation: fadeIn 1s;}
.gallery-photo span.photo-title{position:absolute;bottom:4px;left:4px;}
.gallery-photo span.photo-time{position:absolute;top:4px;left:4px;font-size:0.8rem;}
.gallery-photo:hover span.photo-title{display:block;}
.gallery-photo:hover img{transform: scale(1.1);}
@media screen and (max-width: 1280px) {
	.gallery-photo{width:33.3%;}
}
@media screen and (max-width: 860px) {
	.gallery-photo{width:49.9%;}
}
@media (max-width: 683px){
	.photo-time{display: none;}
}
@keyframes fadeIn{
	0% {opacity: 0;}
   100% {opacity: 1;}
}
</style>
<script src="https://immmmm.com/waterfall.min.js"></script>
<script src="https://immmmm.com/imgStatus.min.js"></script>
<script>
document.addEventListener('DOMContentLoaded', () => {
    imgStatus.watch('.photo-img', function(imgs) {
      if(imgs.isDone()){
        waterfall('.gallery-photos');
        let pagePhoto = document.querySelectorAll('.gallery-photo');
        for(var i=0;i < pagePhoto.length;i++){pagePhoto[i].className += " visible"};
      }
    });
    window.addEventListener('resize', function () {
      waterfall('.gallery-photos');
    });
});
</script>
<script src="https://immmmm.com/view-image.js"></script>
<script src="https://immmmm.com/lately.min.js"></script>
<script>
  window.Lately && Lately.init({ target: '.photo-time'});
  window.ViewImage && ViewImage.init('.gallery-photo img')
</script>
{{ end }}
短代码瀑布流
本地图片推上去后无法正常显示,下面的步骤可能有问题。
- 创建 /layouts/shortcodes/gallery.html
{{ $baseURL := .Site.BaseURL }}
{{- with (.Get 0) -}}
{{- $files := readDir (print "/static/" .) }}
<div class="gallery-photos">
  {{- range (sort $files "Name" "asc") -}}
    {{- if ( .Name | findRE "\\.(gif|jpg|jpeg|tiff|png|bmp|webp|avif|jxl)") }}
    {{- $linkURL := print $baseURL "/" ($.Get 0) "/" .Name | absURL }}
    <div class="gallery-photo">
      <img class="photo-img" loading='lazy' decoding="async" src="{{  $linkURL  }}" alt="{{ .Name }}" />
      <span class="photo-title">{{ .Name | replaceRE "\\..*" ""}}</span>
    </div>
    {{- end }}
  {{- end }}
</div>
{{- end }}
以上代码只是实现了调取图片,瀑布流排版
- 灯箱效果啊还得前端加上。与单页相册相比,去除了对文件名命名的要求,默认是按照文件名排序。可以使用网络图片。
加到顶部:/themes/hugo-theme-stack/layouts/partials/head.html
<style>
    .gallery-photos {
        width: 100%;
    }

    .gallery-photo {
        width: 24.9%;
        position: relative;
        visibility: hidden;
        overflow: hidden;
    }

    .gallery-photo.visible {
        visibility: visible;
        animation: fadeIn 2s;
    }

    .gallery-photo img {
        display: block;
        width: 100%;
        border-radius: 0;
        padding: 4px;
        animation: fadeIn 1s;
        cursor: pointer;
        transition: all .4s ease-in-out;
    }

    .gallery-photo span.photo-title,
    .gallery-photo span.photo-time {
        background: rgba(0, 0, 0, 0.3);
        padding: 0px 8px;
        font-size: 0.9rem;
        color: #fff;
        display: none;
        animation: fadeIn 1s;
    }

    .gallery-photo span.photo-title {
        position: absolute;
        bottom: 4px;
        left: 4px;
    }

    .gallery-photo span.photo-time {
        position: absolute;
        top: 4px;
        left: 4px;
        font-size: 0.8rem;
    }

    .gallery-photo:hover span.photo-title {
        display: block;
    }

    .gallery-photo:hover img {
        transform: scale(1.1);
    }

    @media screen and (max-width: 1270px) {
        .gallery-photo {
            width: 33.3%;
        }
    }

    @media screen and (max-width: 860px) {
        .gallery-photo {
            width: 49.9%;
        }
    }

    @media (max-width: 683px) {
        .photo-time {
            display: none;
        }
    }

    @keyframes fadeIn {
        0% {
            opacity: 0;
        }
        100% {
            opacity: 1;
        }
    }
</style>
加到底部:/themes/hugo-theme-stack/layouts/partials/footer.html
<script src="https://immmmm.com/waterfall.min.js"></script>
<script src="https://immmmm.com/imgStatus.min.js"></script>
<script>
document.addEventListener('DOMContentLoaded', () => {
let galleryPhotos = document.querySelectorAll('.gallery-photos') || ''
if(galleryPhotos){
  imgStatus.watch('.gallery-photo img', function(imgs) {
    if(imgs.isDone()){
      for(var i=0;i < galleryPhotos.length;i++){
        waterfall(galleryPhotos[i]);
        let pagePhoto = galleryPhotos[i].querySelectorAll('.gallery-photo');
        for(var j=0;j < pagePhoto.length;j++){pagePhoto[j].className += " visible"};
      }
    }
  });
  window.addEventListener('resize', function () {
    for(var i=0;i < galleryPhotos.length;i++){
      waterfall(galleryPhotos[i]);
    }
  });
}
});
</script>
//图片灯箱
<script type="text/javascript" src="https://immmmm.com/view-image.js"></script>
<script>
  window.ViewImage && ViewImage.init('.gallery-photo img')
</script>
<script src="https://immmmm.com/waterfall.min.js"></script>
<script src="https://immmmm.com/imgStatus.min.js"></script>
<script>
document.addEventListener('DOMContentLoaded', () => {
  //外链 gallery 标签相册瀑布流
  var photosAll = document.getElementsByTagName('gallery') || '';
  if(photosAll){
    for(var i=0;i < photosAll.length;i++){
      photosAll[i].innerHTML = '<div class="gallery-photos">'+photosAll[i].innerHTML+'</div>'
      var photosIMG = photosAll[i].getElementsByTagName('img')
      for(var j=0;j < photosIMG.length;j++){
        wrap(photosIMG[j], document.createElement('div'));
      }
    }
  }
  function wrap(el, wrapper) {
    wrapper.className = "gallery-photo";
    el.parentNode.insertBefore(wrapper, el);
    wrapper.appendChild(el);
  }
  //相册瀑布流
  let galleryPhotos = document.querySelectorAll('.gallery-photos') || ''
  if(galleryPhotos){
    imgStatus.watch('.gallery-photo img', function(imgs) {
      if(imgs.isDone()){
        for(var i=0;i < galleryPhotos.length;i++){
          waterfall(galleryPhotos[i]);
          let pagePhoto = galleryPhotos[i].querySelectorAll('.gallery-photo');
          for(var j=0;j < pagePhoto.length;j++){pagePhoto[j].className += " visible"};
        }
      }
    });
    window.addEventListener('resize', function () {
      for(var i=0;i < galleryPhotos.length;i++){
        waterfall(galleryPhotos[i]);
      }
    });
  }
});
</script>
此方法图片只显示黑色,弃用:
参考文章 → Hugo博客添加相册功能 | Sulv’s Blog
字数统计对应书籍 shortcode
参考文章 → 写一个 Hugo 短代码将不同类别的总字数统计转换为书名显示 · Dejavu’s Blog
此方法可以在 .md 文件里使用,无法在 footer.html 里生效,我就直接写到 关于
里了。
20230731
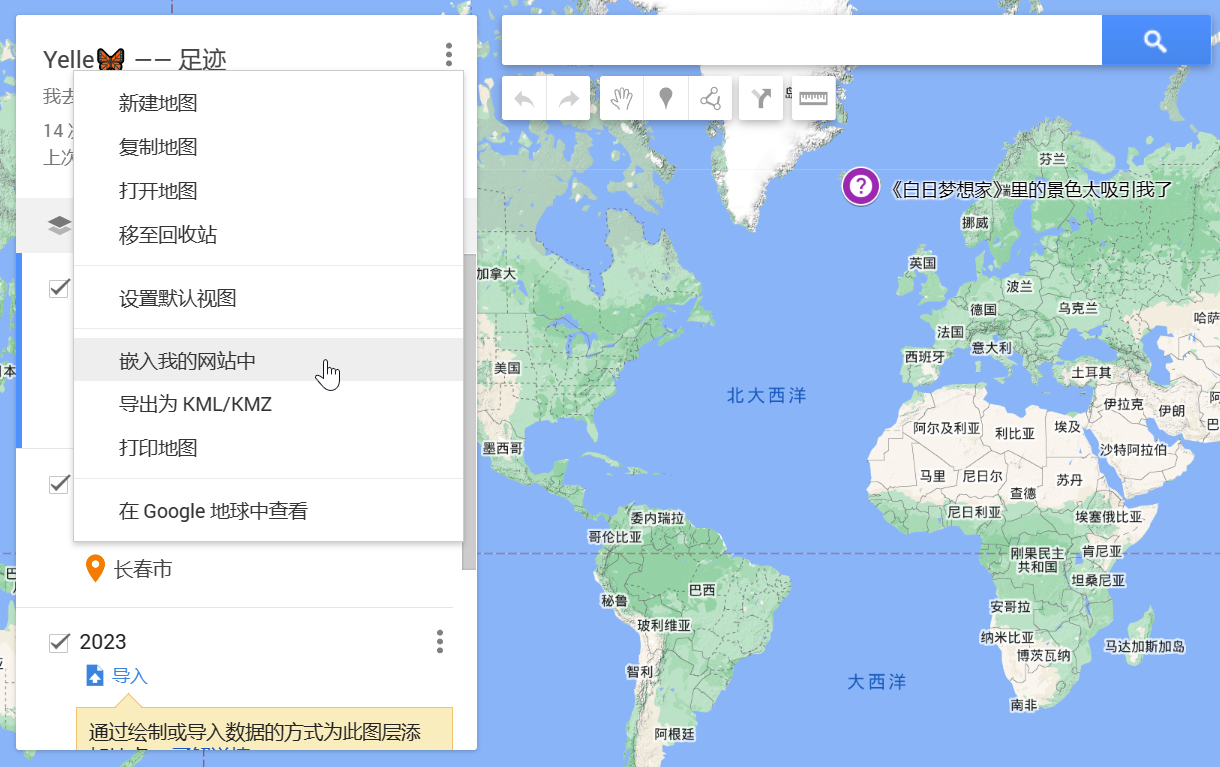
谷歌地图嵌入
参考文章 → 10 分钟 教你用谷歌地图做一张自己的旅行足迹 - 知乎
关于页增加旅游足迹,嵌入谷歌地图。
点击三个点 ——【嵌入我的网站中】,复制代码到想要的位置。
20230725
内容折叠 shortcode
参考文章 → 不是从零开始的 Hugo 建站笔记 (fourxiajiao.github.io)
新建 /themes/hugo-theme-stack/layouts/shortcodes/toggle.html
<details>
    <summary>{{ (.Get 0) }}</summary>
    {{ .Inner | markdownify }}
</details>
效果如下:

20230723
页面左右边栏宽度
在 /themes/hugo-theme-stack/assets/scss/grid.scss 的第 29、30 行,修改为
--left-sidebar-max-width: 14%;
--right-sidebar-max-width: 22%;
更换字体
参考文章 → 【Hugo之路 番外6】hugo自定义全局字体 (gezi.men)
在 /themes/hugo-theme-stack/layouts/partials/head/custom.html 里添加:
<style>
     :root {
        --sys-font-family: "Noto Serif SC";
        --zh-font-family: "Noto Serif SC";
        --base-font-family: "Noto Serif SC";
        --code-font-family: "Noto Serif SC";
        --article-font-family: "Noto Serif SC";
    }
</style>

<script>
    (function() {
        const customFont = document.createElement("link");
        customFont.href =
            "https://fonts.googleapis.com/css2?family=Noto+Serif+SC:wght@400;700&display=swap";

        customFont.type = "text/css";
        customFont.rel = "stylesheet";

        document.head.appendChild(customFont);
    })();
</script>
20230722
返回顶部
参考文章 → Hugo Stack主题装修笔记 (thirdshire.com)
参考文章 → Hugo|自定义 hugo-theme-Stack (ponder.lol)
在 /themes/hugo-theme-stack/layouts/partials/footer/custom.html 内添加代码 或者 在 /themes/hugo-theme-stack/layouts/partials/footer/components/script.html 内添加代码
手机端正常返回顶部,电脑端只能上升一个小标题,似乎是由于固定元素目录的存在。于是改为使用 scrollTo(0, 0) 方法来实现返回顶部效果。
注意:在这个修改后的代码中,backToTop 函数直接调用 window.scrollTo(0, 0) 方法来实现返回顶部效果。请注意,使用 scrollTo 方法不会提供与 scrollIntoView 方法相同的平滑滚动效果,平滑效果可能会因浏览器而异。
<!--返回顶部JS -->
<script>
    // 定义一个函数 backToTop,用于滚动页面到顶部
    function backToTop() {
        // 使用 scrollTo 方法将页面滚动到顶部,平滑效果取决于浏览器的默认行为
        window.scrollTo(0, 0);
    }

    // 当页面加载完成时执行以下代码
    window.onload = function() {
        // 获取当前滚动的垂直位置(兼容不同浏览器的写法)
        let scrollTop = this.document.documentElement.scrollTop || this.document.body.scrollTop;
        // 获取 ID 为 'back-to-top' 的元素,通常是一个返回顶部按钮
        let totopBtn = this.document.getElementById('back-to-top');
        if (scrollTop > 0) {
            // 如果页面滚动位置大于 0,则显示返回顶部按钮
            totopBtn.style.display = 'inline';
        } else {
            // 否则隐藏返回顶部按钮
            totopBtn.style.display = 'none';
        }
    }

    // 当页面滚动时执行以下代码
    window.onscroll = function() {
        // 获取当前滚动的垂直位置(兼容不同浏览器的写法)
        let scrollTop = this.document.documentElement.scrollTop || this.document.body.scrollTop;
        // 获取 ID 为 'back-to-top' 的元素
        let totopBtn = this.document.getElementById('back-to-top');
        if (scrollTop < 200) {
            // 如果滚动位置小于 200 像素,则隐藏返回顶部按钮
            totopBtn.style.display = 'none';
        } else {
            // 否则显示返回顶部按钮,并为按钮添加点击事件,点击时执行 backToTop 函数
            totopBtn.style.display = 'inline';
            totopBtn.addEventListener('click', backToTop, false);
        }
    }
</script>
好物 (失败)
本来想加个 好物 页面,整失败了不说,还把 hugo server 整不行了
重启电脑好了 (+_+)?
20230721
memo 页 (已取消)
安装 docker
参考文章 → :win10系统安装docker (2022年最新填坑)
;
参考文章 → 从零开始的Docker Desktop使用
;
参考文章 → Memos 一个开源且免费的自托管知识库
;
参考文章 → Docker Desktop安装配置及vim的使用
;
参考文章 → Memos 部署记录 | Bore’s Notes
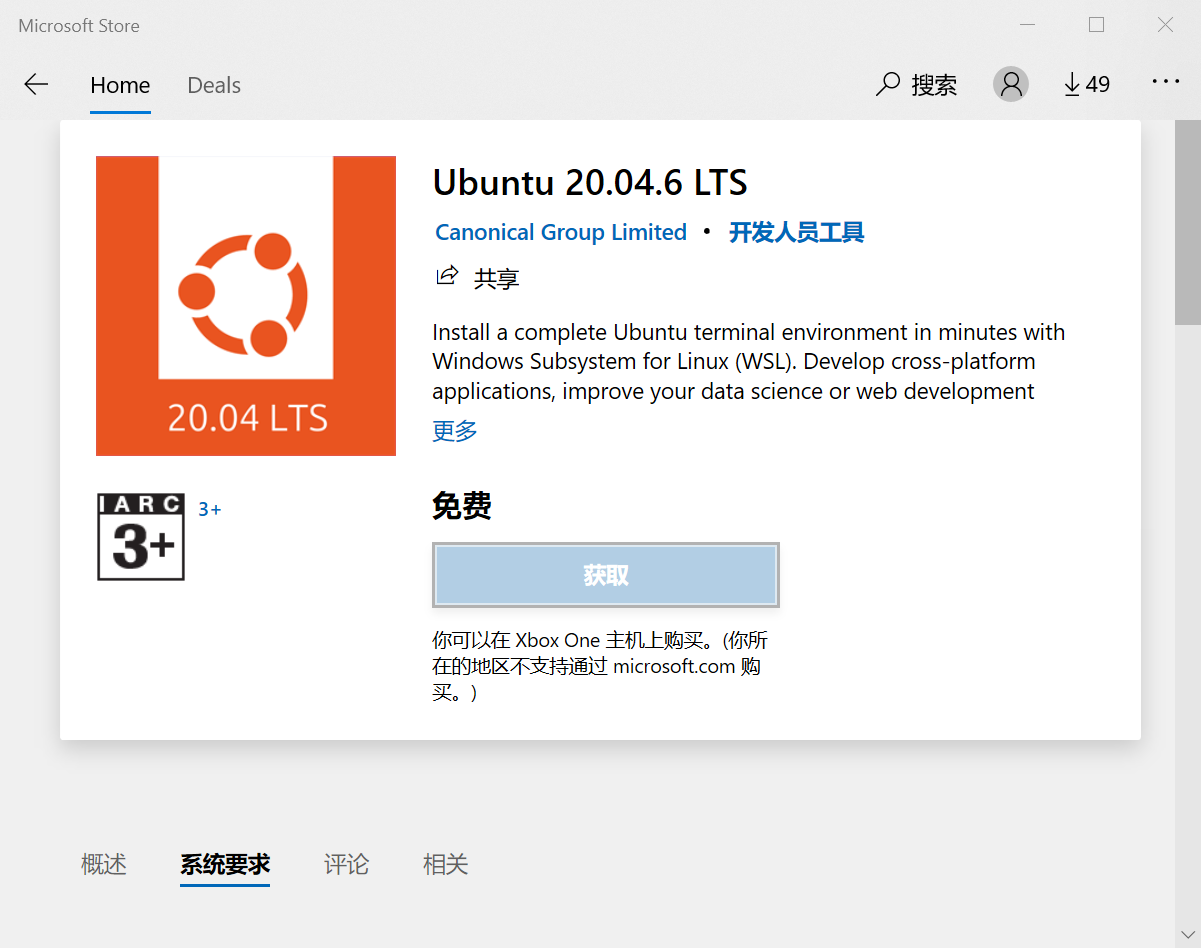
- 下载 Docker Desktop
,同时配置好子系统,Microsoft store 搜索 linux,下载 Ubuntu(注意看一下系统要求)。
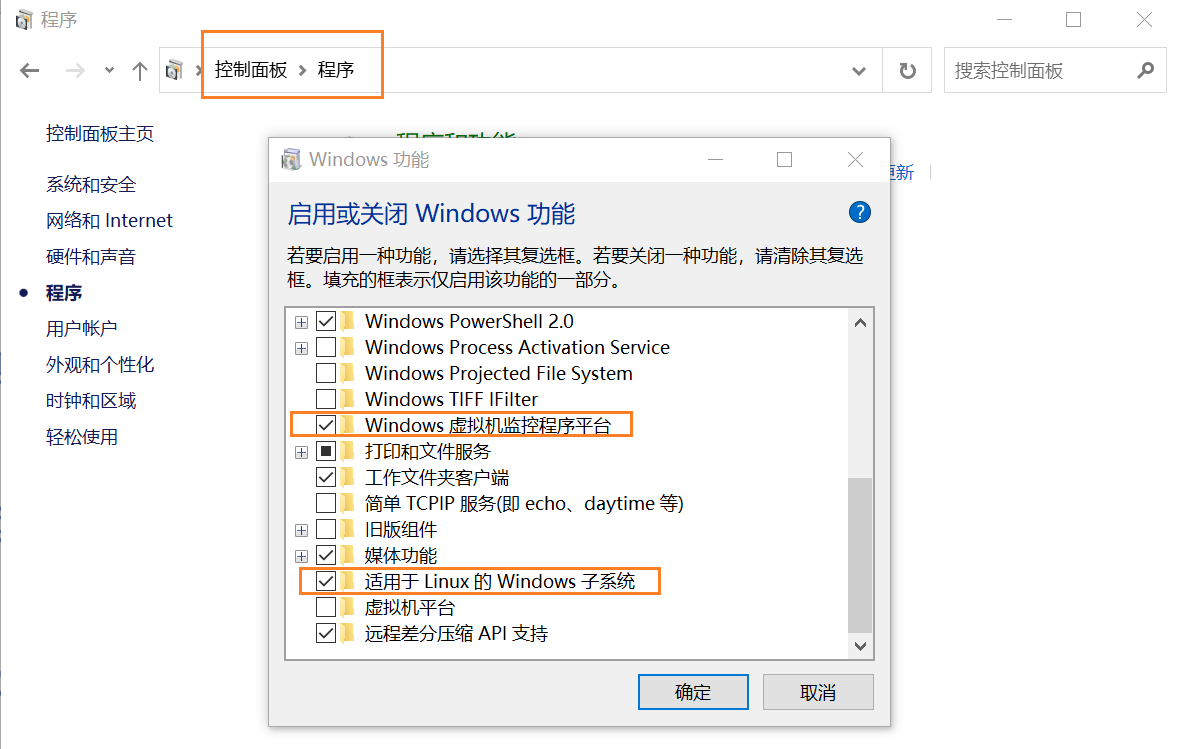
- 打开 Ubuntu 报错 wsl,以管理员身份运行 cmd,输入
netsh winsock reset,确保 任务管理器 — 性能 — CPU — 虚拟化:已启用(如禁用,开机时 bios 一下,查查具体操作),重启电脑。 - 安装 Docker Desktop,再次重启电脑,打开发现报错,安装最新版 wsl2 ,完成后再次打开 Docker。
- 设置开机启动 Hypervisor,以管理员身份运行 PowerShell,输入
bcdedit /set hypervisorlaunchtype auto。 - 右键托盘 Docker 图标 — Settings — Docker Engine — 输入如下代码,使用 163 的源。
{
  "registry-mirrors": [
    "http://hub-mirror.c.163.com",
    "https://docker.mirrors.ustc.edu.cn"
  ],
  "insecure-registries": [],
  "debug": true,
  "experimental": false
}
- 打开 PowerShell,输入
docker run hello-world,没报错,好耶。 - Docker 部署,
docker run -d --name memos -p 5230:5230 -v ~/.memos/:/var/opt/memos neosmemo/memos:latest。 - Docker Compose 部署创建 memos 工作目录
mkdir memos、cd memos。 - 启动 Docker Desktop,
cd memos输入docker run -it ubuntu启动 docker,输入apt-get update进行更新(每次进入docker都需进行安装更新!!!),输入apt-get install -y vim(安装完成后,输入exit可退出 root 权限),vi docker-compose.yaml,编写:
version: "3.0"
services:
  memos:
    image: neosmemo/memos:latest
    restart: always
    container_name: memos
    volumes:
      - ~/.memos/:/var/opt/memos
    ports:
      - 5230:5230
- 【esc】 退出 insert 模式,【i】 进入 insert 模式,
:w保存,:q退出编辑。 - 输入
apt-get update、apt install docker-compose,docker-compose -version。 - 输入
docker-compose up -d,浏览器打开 memos ,注册用户
cd memos
docker-compose down
docker-compose pull
docker-compose up -d
20230719
修复代码出框
参考文章 → Hugo | 看中 Stack 主题的归档功能,搬家并做修改 | 小球飞鱼
提交搜索引擎
参考文章 → Hugo 让 GitHub Pages被索引到 - (affectalways.github.io)
右手做饭烫伤了,今天就到这里。
20230718
修改滚动条样式
参考文章 → Hugo博客 | stack主题修改第一站 (munlelee.github.io)
RSS
参考文章 → 【进阶】15:创建rss · Hugo 零基础建站教程 · 看云 (kancloud.cn)
在根目录 config.yaml 里增加:
menu:
    main: []
        - identifier: RSS
          name: RSS
          url: /index.xml
          params:
              icon: rss1
#自己保存个文件到 themes > hugo-theme-stack > assets >icons > rss1.svg
#如果只想包含 post 里的文章,url: /post/index.xml
如果你的 github 仓库也是私有, rss 阅读器跳转原文时会跳到 github.io 这个域名,出现 404 页面。
那么修改如下代码就能正常跳转回绑定的域名:
修改此文件 /layouts/_default/rss.xml 中包含 {{ .Permalink}} 的三行。
<link>你的域名</link>
<link>你的域名{{ .Permalink | relURL  }}</link>
<guid>https://yelleis.top{{ .Permalink  | relURL  }}</guid>
分类页
social 图标消失 (T - T)
真的很奇怪,本地预览有那三个图标,但 git push 后电脑上就看不到,手机上还是正常显示
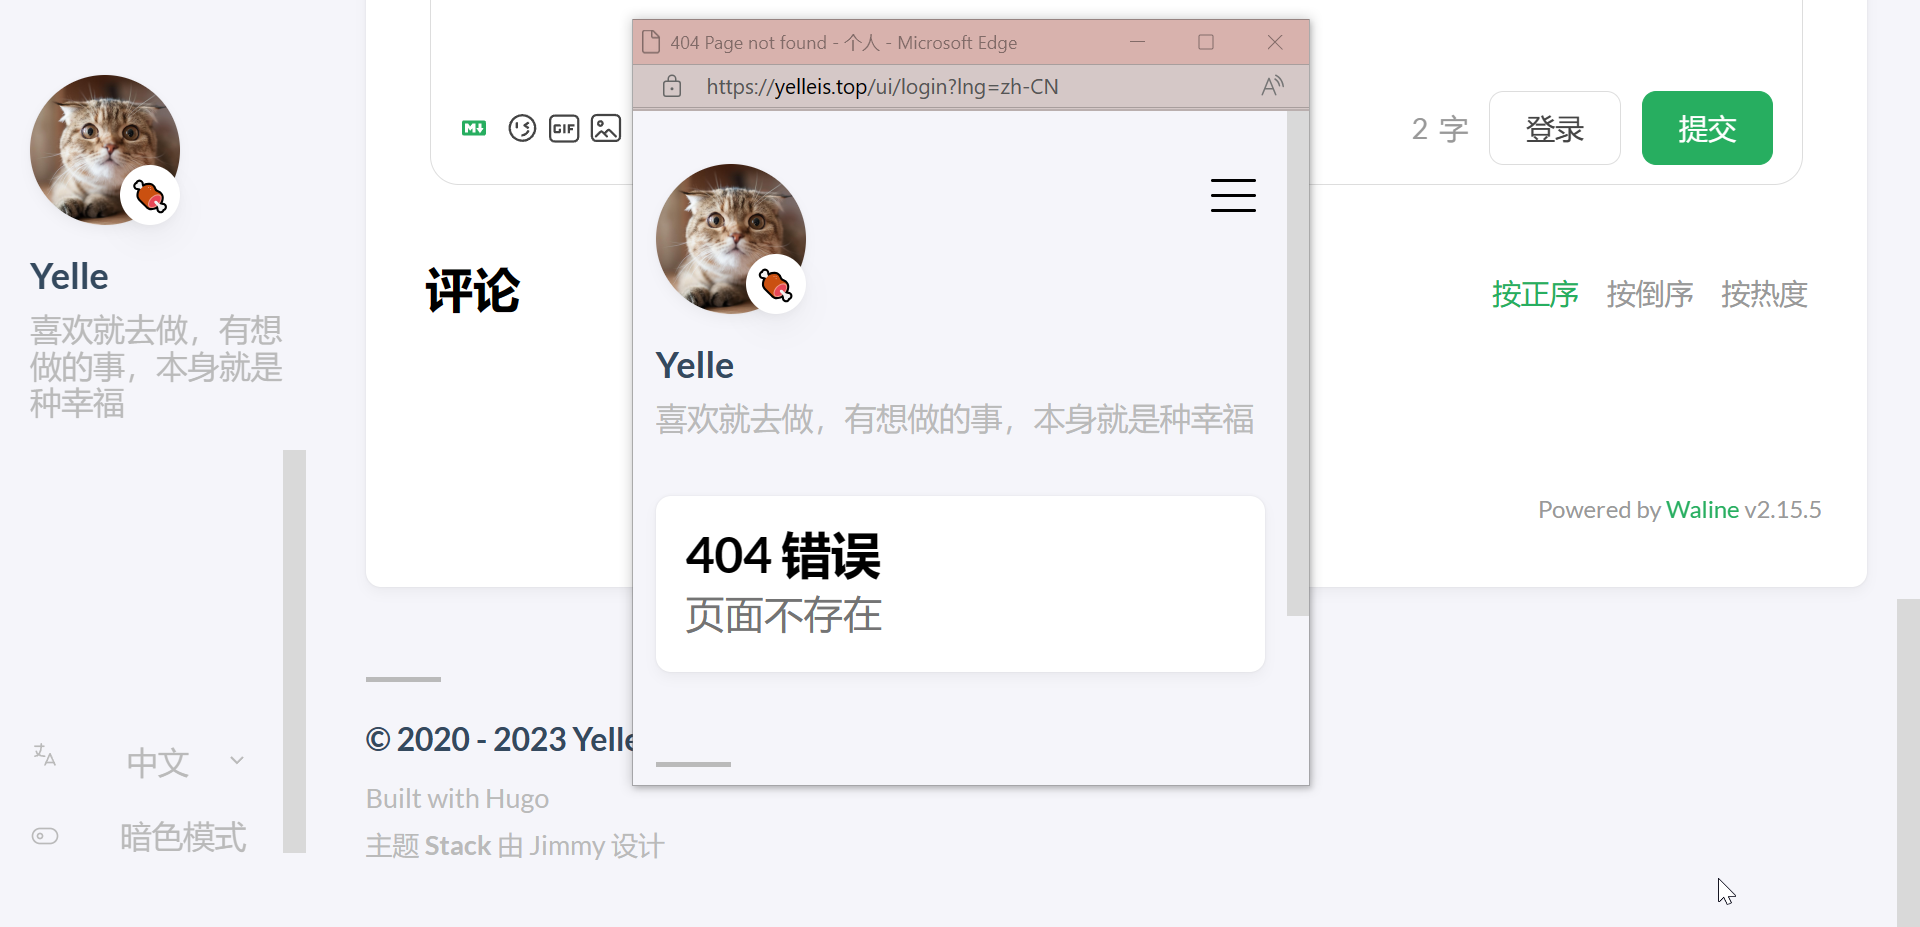
Waline 邮件提醒
参考文章 → Hugo Stack | 删删改改大胆行事 (gregueria.icu)
参考文章 → 评论插件 Waline 之邮件通知配置 | Oragekk’s Blog
删除 Archive 页暖色遮盖
参考文章 → 如何取消Archive页面中对Categories图片的颜色修正 · Issue #364
20230717
显示分类、标签文章数目
参考文章 → Hugo Stack主题装修笔记 (thirdshire.com)
修改此文件 /layouts/partials/widget/categories.html,
tag-cloud.html 同理
                {{ .Page.Title }}  <span class="category-count">{{ .Count }}</span>
            </a> {{ end }}
    </div>
</section>
修改字号
参考文章 → Hugo | 看中 Stack 主题的归档功能,搬家并做修改 | 小球飞鱼
修改此文件 /themes/hugo-theme-stack/assets/scss/variables.scss
本博客已稳定运行 x 天 x 小时 x 分钟
参考文章 → [Hugo] Stack 主题装修笔记 (coderqs.github.io)
字数、文章数
参考文章 → [Hugo] Stack 主题装修笔记 (coderqs.github.io)
侧边栏新增归档、标签页
把 /themes/hugo-theme stack/exampleSite/content/page/ 文件夹挪到 /content/ 文件夹里即可
外部链接图标
参考文章 → Hugo Stack主题装修笔记 (thirdshire.com)
缩小归档页分类卡片尺寸
参考文章 → Hugo Stack主题装修笔记 (thirdshire.com)
友链页面
参考文章 → Hugo Stack主题装修笔记Part 2 (thirdshire.com)
参考文章 → 将Hugo Stack主题友情链接改为双列显示 | Random Tech Notes
20230716
困扰了我两天,无数次推倒重来,在 CloudFlare——【Pages】——【自定义域】那里改一下就好了,域名终于能访问了😂
评论不知道为什么也能正常登录、提交了哈哈哈哈哈
Waline 隐藏评论者的 UA、归属地,小怪物头像
参考文章 → 服务端环境变量 | Waline
参考文章 → 配置 Waline 评论 | 咖喱
Vercel 新增环境变量,【Redeploy】一下。
DISABLE_USERAGENT = true
DISABLE_REGION = true
GRAVATAR_STR = https://cravatar.cn/avatar/{{mail|md5}}?d=monsterid
default 模板
改为 date: {{ now }} ,生成的时候要把秒后面的内容删除。
渲染 html
修改 config.yaml
    goldmark:
        renderer:
            ## Set to true if you have HTML content inside Markdown
            unsafe: true
文章最后修改时间
参考文章 → 自动添加博客页面更新日期 | (yfei.page)
圆角标签
参考文章 → Hugo Stack主题装修笔记 (thirdshire.com)
修改文件夹中此文件 /themes/hugo-theme-stack/assets/scss/variables.scss`
--tag-border-radius: 18px;
#Change from 4px to make it round corner
--body-background:#F9F5F6;
#背景改为自己喜欢的颜色
网站图标
参考文章 → Hugo博客 | stack主题修改第一站 (munlelee.github.io)
先将你需要的图片转换为 .ico 文件,可以用ICO转换器 — Convertio
转换。
之后将 .ico 文件保存在网站根目录 /static/ 文件夹中,重命名为 favicon.ico,修改主题配置文件 config.yaml。
params:
    mainSections:
        - post
    featuredImageField: image
    rssFullContent: true
    favicon: /favicon.ico
20230715
【Waline 评论】
腾讯云先建个二级域名
LeanCloud 国际版也要配置一下二级域名,到腾讯云增添个 dns
整着整着域名不能访问了😮
永久链接
参考文章 → Hugo 永久链接 - Ramen’s Box
sidebar
增加 QQ、邮箱图标
取消 markdown 严格换行
参考文章 → hugo换行 (bboy.app)
在根目录 config.yaml 里设置:
markup:
    goldmark:
        renderer:
            hardWraps: true
一直整到了晚上,CloudFlare 分配的子域名可以正常访问,但是自己的域名还是不能访问😭
20230714
sidebar
更改头像、emoji、subtitle
Waline 评论(失败)
❌第二天又重头再来,先别看这部分
参考文章 → [转] 使用Waline搭建博客评论系统(2022.09更新迁移Waline v2) | H1’s Blog
;
参考文章 → 在 Hugo 主题 Stack 中轻松配置 Waline 评论系统 (imayx.top)
;
参考文章 → Hugo博客添加waline评论系统 - 资讯咖
;
参考文章 → hugo:添加评论功能(Waline) - 建站指南 (zhelper.net)
。
参考文章 → Vercel部署个人博客以及解决DNS污染问题 - cubeyu
;
参考文章 → 解决 Vercel 在国内无法访问 | 随风
;
参考文章 → 关于waline国内无法使用的解决方案 Panzer_Jack的博客
;
参考文章 → Hexo|Butterfly 添加Waline评论系统 | 小鱼のblog
。
总结:腾讯云整个二级域名、增添两条 dns,CloudFlare 新建个 vercel 要求的 dns、ssl 改为严格模式
注册成功账号,但无法登录评论,明天再搞😴